Blog

  • robotic-inbox

    Robotic Inbox Status: 💟 End of Life

    🚀 Automatic Release ✅ Dedicated Servers Supported ServerSide ✅ Single Player and P2P Supported

    Table of Contents

    Summary

    A special container that automatically sorts and distributes items to other nearby storage containers.

    💟 This mod has reached End of Life and will not be directly updated to support 7 Days to Die 2.0 or beyond. Because this mod is MIT-Licensed and open-source, it is possible that other modders will keep this concept going in the future.

    Searching NexusMods or 7 Days to Die Mods may lead to discovering other mods either built on top of or inspired by this mod.

    robotic inbox, standard color

    Support

    💟 This mod has reached its end of life and is no longer supported or maintained by Kanaverum (Jonathan Robertson // me). I am instead focused on my own game studio (Calculating Chaos, if curious).

    ❤️ All of my public mods have always been open-source and are MIT-Licensed; please feel free to take some or all of the code to reuse, modify, redistribute, and even rebrand however you like! The code in this project isn’t perfect; as you update, add features, fix bugs, and otherwise improve upon my ideas, please make sure to give yourself credit for the work you do and publish your new version of the mod under your own name 😄 🎉

    Features

    Automatic Item Distribution and Organization

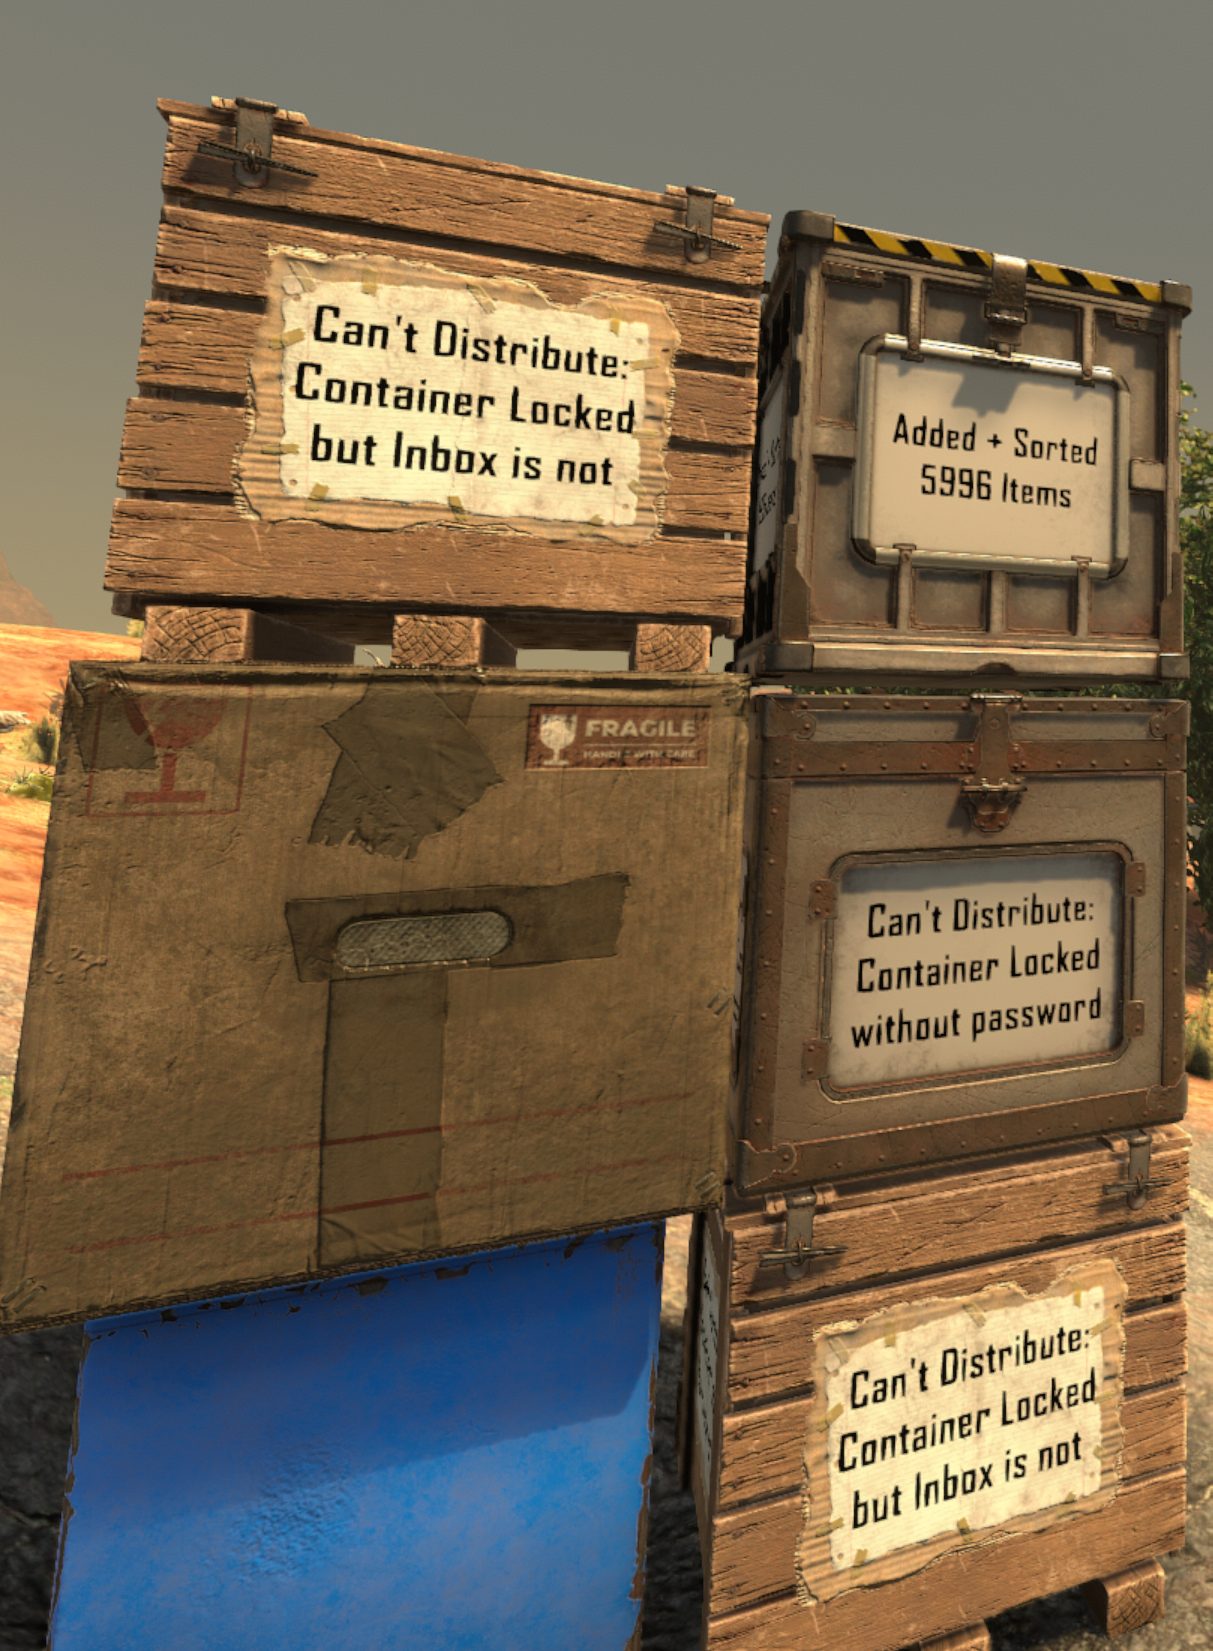
    This container will automatically distribute resources placed within it if they are present in other nearby containers. Resources can be distributed to any container within 5 meters by default (horizontally and vertically), so long as the following conditions are met:

    1. If inbox is locked, target must be locked, and share same password.
    2. If inbox is unlocked, target must also be unlocked.
    3. If inbox is within an LCB, target must also be within that same LCB.
    4. Backpack, vehicle, and storage not placed by a player are ignored.

    Press & hold Action Key to lock it or set a combination.

    This explanation is included in-game as the Robotic Inbox Block Description.

    Dynamic Hints

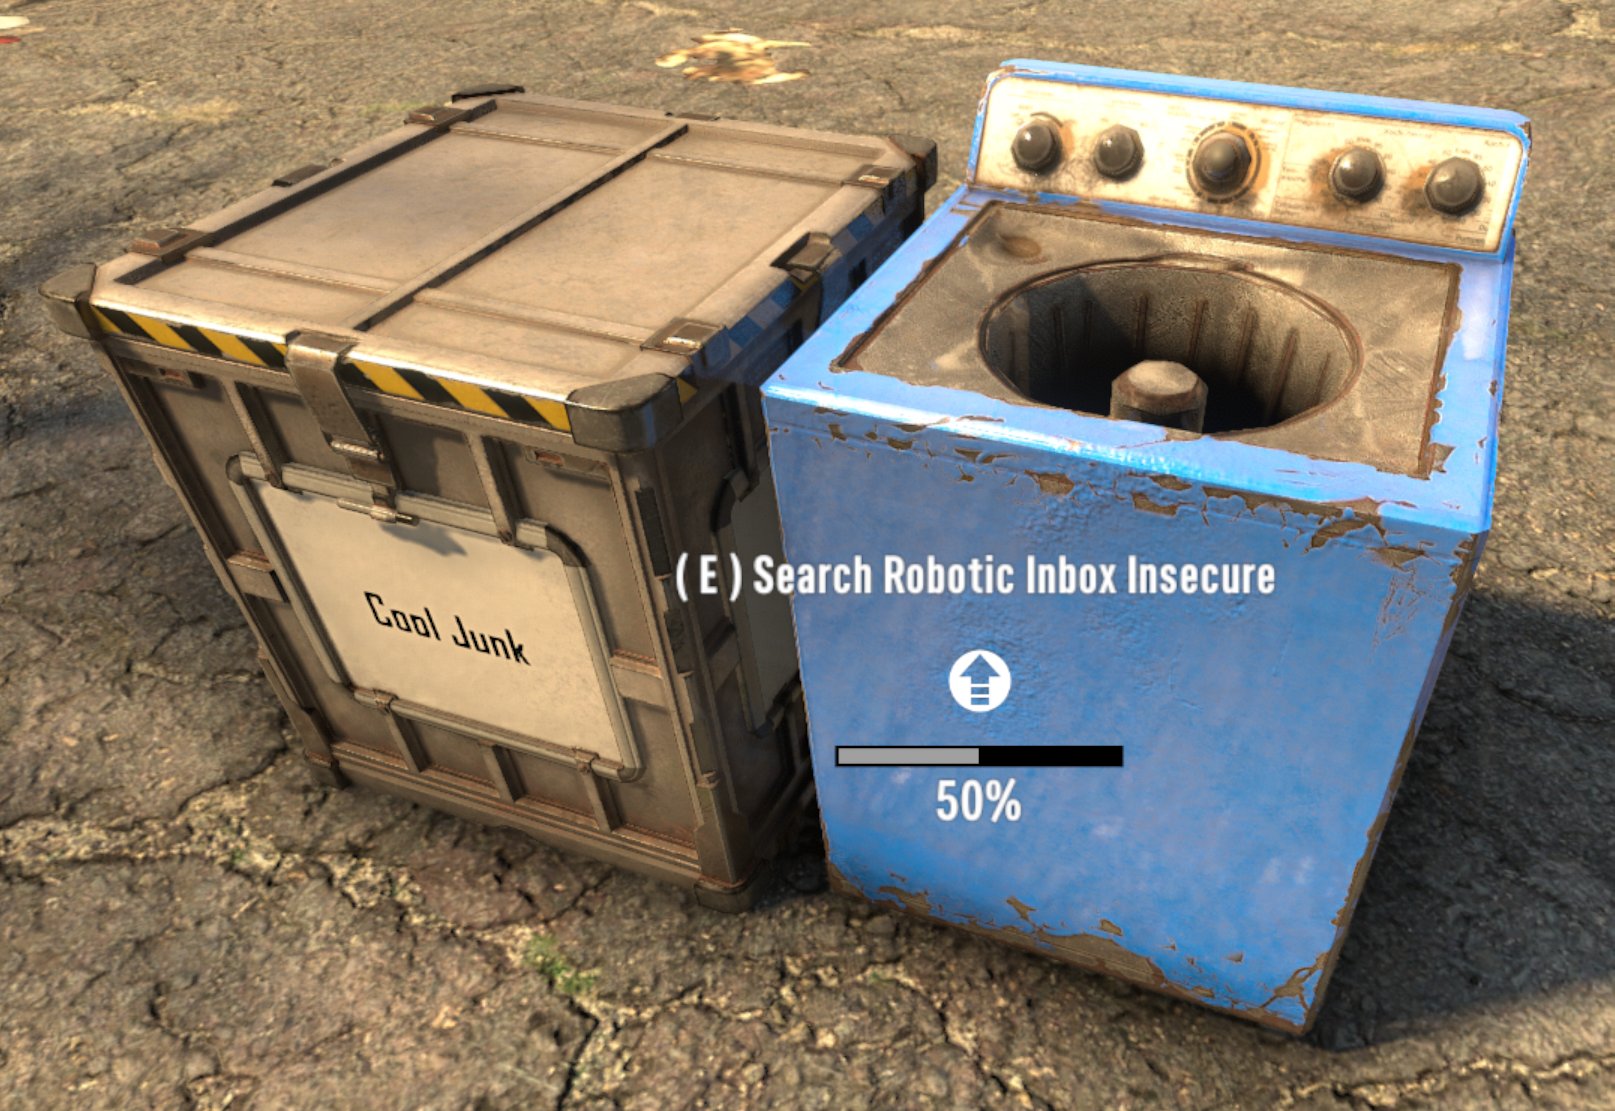
    ✏️ While any secure or insecure player-placed storage container can be targeted by the Inbox, Writable Storage Containers will describe how the Inbox is interacting with them, making them the recommended type of container to place near an Inbox.

    robotic inbox being repaired

    Repairable Locks (new to v4)

    If someone busts your lock, you can replace the lock simply by repairing it. This will go through the upgrade flow and should appear relatively seamless.

    Or if you break the lock on someone else’s Robotic Inbox (such as a friend no longer logs in), breaking the lock and repairing it will allow you to take ownership of the Inbox and adjust its password, lock state, etc.

    ⚠️ Robotic Inboxes with broken locks will not be able to distribute items again until they’re repaired.

    robotic inbox being repaired

    Multiple Colors (new to v4)

    robotic inboxes with colors (unlit)

    unlit in daylight

    robotic inboxes with colors (lit)

    lit in daylight with a headlamp

    Configuration Options (new to v4)

    You now have a slew of options you can use to fine-tune the experience for yourself and any other players who happen to join your game!

    Command Default Constraints Description Impact
    help roboticinbox N/A N/A Receive help information about the set of commands this mod provides N/A
    ri horizontal-range <int> 5 0 to 128 set how wide (x/z axes) the inbox should scan for storage containers very high
    ri vertical-range <int> 5 -1 to 253 (-1 = bedrock-to-sky) set how high/low (y axis) the inbox should scan for storage containers high
    ri success-notice-time <float> 2.0 0.0 to 10.0 set how long to leave distribution success notice on boxes N/A
    ri blocked-notice-time <float> 3.0 0.0 to 10.0 set how long to leave distribution blocked notice on boxes N/A
    ri base-siphoning-protection <bool> True True or False whether inboxes within claimed land should prevent scanning outside the bounds of their lcb N/A
    ri dm False True or False toggle debug logging mode medium
    ri debug False True or False toggle debug logging mode (same as dm) medium
    • 📝 Settings like horizontal-range and vertical-range will actually update the block description for your players as well, so things remain clear and accurate. Changes made during runtime will even auto-update the block description for all online players, too!
    • 💾 Except for debug, these settings are retained in a file on the host system:
      • Windows: %AppData%\Roaming\7DaysToDie\Saves\MapName\GameName\robotic-inbox.json
      • Linux: ~/.local/.local/share/7DaysToDie/Saves/MapName/GameName/robotic-inbox.json

    Info

    What Happens to Leftovers?

    📦 Any items in the Inbox that are not able to be matched with another container will be left there until you have time to decide which container to store them in.

    How Would I Acquire a Robotic Inbox In-Game?

    🏪 Robotic Inbox can be purchased from a trader as soon as you start the game.

    🛠️ Robotic Inboxes can also be crafted at the Workbench after reading enough about robotics to also craft a Tier 1 Junk Sledge.

    Ingredient Count
    resourceForgedIron 4
    resourceMetalPipe 3
    resourceMechanicalParts 6
    resourceElectricParts 8

    For Hosts/Admins: Performance Considerations

    This mod does a lot, so I would understand if you have any concern around how much load it would add to your server.

    Here are some things I kept in mind as I was designing and tweaking this mod:

    • Container data is already processed server-side in 7 days to die. This means that
      1. adjustments to storage are actually most performant on the server’s end rather than on the client’s end and…
      2. this approach to manipulating container data actually reduces networking calls vs any client-side mod that operates from the players’ ends
    • Container organization is run on each box within range via a concurrent loop. This ensures that as inboxes are scanning and updating your players’ containers, the server can still process other tasks and avoid zombie or crafting lag.

    Setup

    Without proper installation, this mod will not work as expected. Using this guide should help to complete the installation properly.

    If you have trouble getting things working, you can reach out to me for support via Support.

    Environment / EAC / Hosting Requirements

    Environment Compatible Does EAC Need to be Disabled? Who needs to install?
    Dedicated Server Yes no only server
    Peer-to-Peer Hosting Yes only on the host only the host
    Single Player Game Yes Yes self (of course)

    🤔 If you aren’t sure what some of this means, details steps are provided below to walk you through the setup process.

    Map Considerations for Installation or Uninstallation

    • Does adding this mod require a fresh map?
      • No! You can drop this mod into an ongoing map without any trouble.
    • Does removing this mod require a fresh map?
      • Since this mod adds new blocks, removing it from a map could cause some issues: previously placed robotic inbox blocks would now throw exceptions in your logs, at the very least.

    Windows PC (Single Player or Hosting P2P)

    ℹ️ If you plan to host a multiplayer game, only the host PC will need to install this mod. Other players connecting to your session do not need to install anything for this mod to work 😉

    1. 📦 Download the latest release by navigating to this link and clicking the link for robotic-inbox.zip
    2. 📂 Unzip this file to a folder named robotic-inbox by right-clicking it and choosing the Extract All... option (you will find Windows suggests extracting to a new folder named robotic-inbox – this is the option you want to use)
    3. 🕵️ Locate and create your mods folder (if missing): in another Windows Explorer window or tab, paste %APPDATA%\7DaysToDie into your address bar and, double-click your Mods folder to enter it.
      • If no Mods folder is present, you will first need to create it, then enter your Mods folder after that
    4. 🚚 Move your new robotic-inbox folder into your Mods folder by dragging & dropping or cutting/copying & pasting, whichever you prefer
    5. ♻️ Stop the game if it’s currently running, then start the game again without EAC by navigating to your install folder and running 7DaysToDie.exe
      • running from Steam or other launchers usually starts 7 Days up with the 7DaysToDie_EAC.exe program instead, but running 7 Days directly will skip EAC startup

    Critical Reminders

    • ⚠️ it is NECESSARY for the host to run with EAC disabled or the DLL file in this mod will not be able to run
    • 😉 other players DO NOT need to disable EAC in order to connect to your game session, so you don’t need to walk them through these steps
    • 🔑 it is also HIGHLY RECOMMENDED to add a password to your game session
      • while disabling EAC is 100% necessary (for P2P or single player) to run this mod properly, it also allows other players to run any mods they want on their end (which could be used to gain access to admin commands and/or grief you or your other players)
      • please note that dedicated servers do not have this limitation and can have EAC fully enabled; we have setup guides for dedicated servers as well, listed in the next 2 sections: Windows/Linux Installation (Server via FTP from Windows PC) and Linux Server Installation (Server via SSH)

    Windows/Linux Installation (Server via FTP from Windows PC)

    1. 📦 Download the latest release by navigating to this link and clicking the link for robotic-inbox.zip
    2. 📂 Unzip this file to a folder named robotic-inbox by right-clicking it and choosing the Extract All... option (you will find Windows suggests extracting to a new folder named robotic-inbox – this is the option you want to use)
    3. 🕵️ Locate and create your mods folder (if missing):
      • Windows PC or Server: in another window, paste this address into to the address bar: %APPDATA%\7DaysToDie, then enter your Mods folder by double-clicking it. If no Mods folder is present, you will first need to create it, then enter your Mods folder after that
      • FTP: in another window, connect to your server via FTP and navigate to the game folder that should contain your Mods folder (if no Mods folder is present, you will need to create it in the appropriate location), then enter your Mods folder. If you are confused about where your mods folder should go, reach out to your host.
    4. 🚚 Move this new robotic-inbox folder into your Mods folder by dragging & dropping or cutting/copying & pasting, whichever you prefer
    5. ♻️ Restart your server to allow this mod to take effect and monitor your logs to ensure it starts successfully:
      • you can search the logs for the word RoboticInbox; the name of this mod will appear with that phrase and all log lines it produces will be presented with this prefix for quick reference

    Linux Server Installation (Server via SSH)

    1. 🔍 SSH into your server and navigate to the Mods folder on your server
      • if you installed 7 Days to Die with LinuxGSM (which I’d highly recommend), the default mods folder will be under ~/serverfiles/Mods (which you may have to create)
    2. 📦 Download the latest robotic-inbox.zip release from this link with whatever tool you prefer
      • example: wget https://github.com/jonathan-robertson/robotic-inbox/releases/latest/download/robotic-inbox.zip
    3. 📂 Unzip this file to a folder by the same name: unzip robotic-inbox.zip -d robotic-inbox
      • you may need to install unzip if it isn’t already installed: sudo apt-get update && sudo apt-get install unzip
      • once unzipped, you can remove the robotic-inbox download with rm robotic-inbox.zip
    4. ♻️ Restart your server to allow this mod to take effect and monitor your logs to ensure it starts successfully:
      • you can search the logs for the word RoboticInbox; the name of this mod will appear with that phrase and all log lines it produces will be presented with this prefix for quick reference
      • rather than monitoring telnet, I’d recommend viewing the console logs directly because mod and DLL registration happens very early in the startup process and you may miss it if you connect via telnet after this happens
      • you can reference your server config file to identify your logs folder
      • if you installed 7 Days to Die with LinuxGSM, your console log will be under log/console/sdtdserver-console.log
      • I’d highly recommend using less to open this file for a variety of reasons: it’s safe to view active files with, easy to search, and can be automatically tailed/followed by pressing a keyboard shortcut so you can monitor logs in realtime
        • follow: SHIFT+F (use CTRL+C to exit follow mode)
        • exit: q to exit less when not in follow mode
        • search: /RoboticInbox [enter] to enter search mode for the lines that will be produced by this mod; while in search mode, use n to navigate to the next match or SHIFT+n to navigate to the previous match
    Visit original content creator repository
  • mayLCU

    mayLCU

    mayLCU is a C# library that provides a convenient way to interact with the League of Legends Client (LCU) through its HTTP API. It allows you to perform various actions such as making requests, retrieving data, and sending commands to the League Client.

    Usage

    Creating an instance of LCU

    To create an instance of LCU and connect to the League of Legends Client, you can use the provided factory methods:

    • HookRiotClient(): Connects to the Riot Client.
    • HookLeagueClient(): Connects to the League Client.
    • HookLeagueStore(LCU leagueClient): Connects to the League Store.

    Example:

    LCU lcu = LCU.HookLeagueClient();

    Making Requests

    mayLCU provides methods to make HTTP requests to the League of Legends Client API. You can use the following methods:

    • RequestAsync(string uri): Sends an asynchronous GET request to the specified URI and returns the response as a string.
    • RequestAsync(RequestMethod requestMethod, string uri, string payload = ""): Sends an asynchronous HTTP request with the specified method (GET, POST, PUT, DELETE, etc.), URI, and payload. Returns the response as a string.

    Example:

    string response = await lcu.RequestAsync("/lol-summoner/v1/current-summoner");

    Handling Responses

    You can also make requests that return dynamic objects instead of strings. The library provides methods for that purpose:

    • RequestDynamicAsync(string uri): Sends an asynchronous GET request to the specified URI and returns the response as a dynamic object.
    • RequestDynamicAsync(RequestMethod requestMethod, string uri, string payload = ""): Sends an asynchronous HTTP request with the specified method (GET, POST, PUT, DELETE, etc.), URI, and payload. Returns the response as a dynamic object.

    Example:

    dynamic data = await lcu.RequestDynamicAsync("/lol-summoner/v1/current-summoner");
    string summonerName = data.displayName;

    Synchronous Requests

    If you prefer to make synchronous requests instead of asynchronous ones, mayLCU provides equivalent synchronous methods:

    • Request(string uri): Sends a synchronous GET request to the specified URI and returns the response as a string.
    • Request(RequestMethod requestMethod, string uri, string payload = ""): Sends a synchronous HTTP request with the specified method (GET, POST, PUT, DELETE, etc.), URI, and payload. Returns the response as a string.

    Example:

    string response = lcu.Request("/lol-summoner/v1/current-summoner");

    Additional Information

    • IsConnected: Gets a value indicating whether the connection to the League Client is established.
    • Target: Gets the targeted process name (without the “Ux” suffix).

    Examples

    Here are some examples of how you can use mayLCU:

    // Hook League Client
    LCU lcu = LCU.HookLeagueClient();
    
    // Get the current summoner's name
    dynamic data = await lcu.RequestDynamicAsync("/lol-summoner/v1/current-summoner");
    string summonerName = data.displayName;
    Console.WriteLine($"Summoner Name: {summonerName}");

    // Hook League Client
    LCU leagueClient = LCU.HookLeagueClient();
    
    // Hook League Store using the leagueClient instance
    LCU leagueStoreClient = LCU.HookLeagueStore(leagueClient);
    
    // Example: Make a purchase request
    var httpPayload = $"{{\"accountId\":{accountId},\"items\":[{{\"inventoryType\":\"{type}\",\"itemId\":{itemId},\"ipCost\":null,\"rpCost\":{rpPrice},\"quantity\":1}}]}}"
    dynamic data = await leageuStoreClient.RequestDynamicAsync(RequestMethod.POST, "/storefront/v3/purchase?language=en_US", httpPayload)

    Disclaimer

    This project is not affiliated with or endorsed by Riot Games.

    Visit original content creator repository

  • dataclasses-jsonschema

    Dataclasses JSON Schema

    http://valqo.top/wp-content/uploads/2025/12/1765731601_143_badge.svg

    ⚠️Please Note⚠️: Because of health reasons I’m not longer able to make changes to this project or make further releases via PyPI.

    A library to generate JSON Schema from python 3.7 dataclasses. Python 3.6 is supported through the dataclasses backport. Aims to be a more lightweight alternative to similar projects such as marshmallow & pydantic.

    Feature Overview

    • Support for draft-04, draft-06, Swagger 2.0 & OpenAPI 3 schema types
    • Serialisation and deserialisation
    • Data validation against the generated schema
    • APISpec support. Example below:

    Installation

    ~$ pip install dataclasses-jsonschema

    For improved validation performance using fastjsonschema, install with:

    ~$ pip install dataclasses-jsonschema[fast-validation]

    For improved uuid performance using fastuuid, install with:

    ~$ pip install dataclasses-jsonschema[fast-uuid]

    For improved date and datetime parsing performance using ciso8601, install with:

    ~$ pip install dataclasses-jsonschema[fast-dateparsing]

    Beware ciso8601 doesn’t support the entirety of the ISO 8601 spec, only a popular subset.

    Examples

    from dataclasses import dataclass
    
    from dataclasses_jsonschema import JsonSchemaMixin
    
    
    @dataclass
    class Point(JsonSchemaMixin):
        "A 2D point"
        x: float
        y: float

    Schema Generation

    >>> pprint(Point.json_schema())
    {
        'description': 'A 2D point',
        'type': 'object',
        'properties': {
            'x': {'format': 'float', 'type': 'number'},
            'y': {'format': 'float', 'type': 'number'}
        },
        'required': ['x', 'y']
    }

    Data Serialisation

    >>> Point(x=3.5, y=10.1).to_dict()
    {'x': 3.5, 'y': 10.1}

    Deserialisation

    >>> Point.from_dict({'x': 3.14, 'y': 1.5})
    Point(x=3.14, y=1.5)
    >>> Point.from_dict({'x': 3.14, y: 'wrong'})
    dataclasses_jsonschema.ValidationError: 'wrong' is not of type 'number'

    Generating multiple schemas

    from dataclasses_jsonschema import JsonSchemaMixin, SchemaType
    
    @dataclass
    class Address(JsonSchemaMixin):
        """Postal Address"""
        building: str
        street: str
        city: str
    
    @dataclass
    class Company(JsonSchemaMixin):
        """Company Details"""
        name: str
        address: Address
    
    >>> pprint(JsonSchemaMixin.all_json_schemas(schema_type=SchemaType.SWAGGER_V3))
    {'Address': {'description': 'Postal Address',
                 'properties': {'building': {'type': 'string'},
                                'city': {'type': 'string'},
                                'street': {'type': 'string'}},
                 'required': ['building', 'street', 'city'],
                 'type': 'object'},
     'Company': {'description': 'Company Details',
                 'properties': {'address': {'$ref': '#/components/schemas/Address'},
                                'name': {'type': 'string'}},
                 'required': ['name', 'address'],
                 'type': 'object'}}

    Custom validation using NewType

    from dataclasses_jsonschema import JsonSchemaMixin, FieldEncoder
    
    PhoneNumber = NewType('PhoneNumber', str)
    
    class PhoneNumberField(FieldEncoder):
    
        @property
        def json_schema(self):
            return {'type': 'string', 'pattern': r'^(\([0-9]{3}\))?[0-9]{3}-[0-9]{4}$'}
    
    JsonSchemaMixin.register_field_encoders({PhoneNumber: PhoneNumberField()})
    
    @dataclass
    class Person(JsonSchemaMixin):
        name: str
        phone_number: PhoneNumber

    For more examples see the tests

    APISpec Plugin

    New in v2.5.0

    OpenAPI & Swagger specs can be generated using the apispec plugin:

    from typing import Optional, List
    from dataclasses import dataclass
    
    from apispec import APISpec
    from apispec_webframeworks.flask import FlaskPlugin
    from flask import Flask, jsonify
    import pytest
    
    from dataclasses_jsonschema.apispec import DataclassesPlugin
    from dataclasses_jsonschema import JsonSchemaMixin
    
    
    # Create an APISpec
    spec = APISpec(
        title="Swagger Petstore",
        version="1.0.0",
        openapi_version="3.0.2",
        plugins=[FlaskPlugin(), DataclassesPlugin()],
    )
    
    
    @dataclass
    class Category(JsonSchemaMixin):
        """Pet category"""
        name: str
        id: Optional[int]
    
    @dataclass
    class Pet(JsonSchemaMixin):
        """A pet"""
        categories: List[Category]
        name: str
    
    
    app = Flask(__name__)
    
    
    @app.route("/random")
    def random_pet():
        """A cute furry animal endpoint.
        ---
        get:
          description: Get a random pet
          responses:
            200:
              content:
                application/json:
                  schema: Pet
        """
        pet = get_random_pet()
        return jsonify(pet.to_dict())
    
    # Dependant schemas (e.g. 'Category') are added automatically
    spec.components.schema("Pet", schema=Pet)
    with app.test_request_context():
        spec.path(view=random_pet)

    TODO

    Visit original content creator repository
  • dotfiles

    Zhou Xianghui’s dotfiles using bspwm polybar

     ______                __  ___                   _           _
    |__  / |__   ___  _   _\ \/ (_) __ _ _ __   __ _| |__  _   _(_)
      / /| '_ \ / _ \| | | |\  /| |/ _` | '_ \ / _` | '_ \| | | | |
     / /_| | | | (_) | |_| |/  \| | (_| | | | | (_| | | | | |_| | |
    /____|_| |_|\___/ \__,_/_/\_\_|\__,_|_| |_|\__, |_| |_|\__,_|_|
                                               |___/
    
     ____        _    __ _ _
    |  _ \  ___ | |_ / _(_) | ___  ___
    | | | |/ _ \| __| |_| | |/ _ \/ __|
    | |_| | (_) | |_|  _| | |  __/\__ \
    |____/ \___/ \__|_| |_|_|\___||___/
    

    [Dependencies]

    • archlinux Arch Linux is an independently developed, x86-64 general-purpose GNU/Linux distribution that strives to provide the latest stable versions of most software by following a rolling-release model. The default installation is a minimal base system, configured by the user to only add what is purposely required.
    • GNU Stow The way you manage your dotfiles. A symlink farm manager which takes distinct packages of software and/or data located in separate directories on the filesystem, and makes them appear to be installed in the same place.
    • awesomewm awesome is a highly configurable, next generation framework window manager for X. It is very fast, extensible and licensed under the GNU GPLv2 license. It is primarily targeted at power users, developers and any people dealing with every day computing tasks and who want to have fine-grained control on their graphical environment.
    • Rofi A window switcher, application launcher and dmenu replacement.
    • picom A lightweight compositor for X11 (previously a compton fork)
    • doom-emacs Doom is a configuration framework for GNU Emacs tailored for Emacs bankruptcy veterans who want less framework in their frameworks, a modicum of stability (and reproducibility) from their package manager, and the performance of a hand rolled config (or better). It can be a foundation for your own config or a resource for Emacs enthusiasts to learn more about our favorite operating system.
    • ranger A VIM-inspired filemanager for the console.
    • zathura A highly customizable and functional document viewer. It provides a minimalistic and space saving interface as well as an easy usage that mainly focuses on keyboard interaction.
    • mpv A free (as in freedom) media player for the command line. It supports a wide variety of media file formats, audio and video codecs, and subtitle types.
    • termite A keyboard-centric VTE-based terminal, aimed at use within a window manager with tiling and/or tabbing support.
    • ydcv YouDao Console Version – Simple wrapper for Youdao online translate (Chinese <-> English) service API, as an alternative to the StarDict Console Version(sdcv).

    Intallation

    Make Sure You have Gnu Stow Installed

    stow -R 

    Screenshots

    • Desktop

    ./img/desktop.png

    • Gotop

    ./img/gotop.png

    • Mpv && Pulsemixer

    ./img/play-video.png

    • Doom Emacs

    ./img/doom-emacs.png

    • Ranger

    ./img/ranger.png

    • Music Player ncmpcpp

    ./img/ncmpcpp.png

    Visit original content creator repository
  • pillar-ui

    Pillar-ui Design System

    What is pillar-ui

    Pillar is a modern design system built with React, with the goal of providing a comprehensive set of reusable UI components that are fully accessible and adhere to best practices in modern web development.

    Features

    • Lightweight: Only 11KB. Built as a lightweight alternative with full support for RTL languages, TypeScript, dark mode, and customization at both global and component levels.
    • Accessibility: Fully compliant with WCAG 2.1 guidelines, including color contrast, high contrast mode, semantic markup, keyboard navigation, text resizing, and reduced-motion support.
    • Modularity: Each component is standalone and extensible, allowing for flexible usage in isolation or in combination for building complex UIs.
    • Consistency: Promotes a unified design language and consistent naming conventions for better usability and developer experience.
    • Flexibility: Offers variants and customization options while following best practices in CSS and JavaScript to reduce bundle size and boost runtime performance.
    • Responsive: Built with fluid design principles. Spacing, typography, and layout adapt seamlessly across screen sizes by default.
    • Theming: Powered by CSS variables, making it easy to create and apply custom themes that reflect any brand or application style.
    • Icon Component: Includes a fully customizable icon component with a rich set of prebuilt icons.
    • Hooks: Ships with helpful React hooks to simplify UI interactions like toggling menus and handling user input.
    • Usability: Designed with UX best practices to ensure a consistent, intuitive, and accessible experience for users.

    Installation

    Before You Install we need to let you know that pillar contain four packages (core, hooks,utils icons).

    # you can install all of them or only what you need
    
    #NPM
    npm i @pillar-ui/core
    # (or | and)
    npm i @pillar-ui/hooks
    # (or | and)
    npm i @pillar-ui/icons
    
    #Yarn
    yarn add @pillar-ui/core
    # (or | and)
    yarn add @pillar-ui/hooks
    # (or | and)
    yarn add @pillar-ui/icons

    How to use it

    import { Button, InputPassword, Input, Checkbox } from 'core'
    import { useBoolean } from 'hooks'
    import * as Icons from 'icons'
    
    function MyComponent() {
      const { state, handleToggle } = useBoolean()
    
      return (
        <form aria-label="Register page">
          <Input required name="name" autoComplete="name" label="Name" />
          <Input type="Email" required name="email" autoComplete="email" label="Email" />
          <InputPassword
            required
            autoComplete="new-password"
            label="password"
            hint="password must be between 6 to 30 character"
          />
          <Checkbox color="p" onChange={handleToggle} label="I agree to the terms and conditions" />
          <Button icon={<Icons.Send name="heart" size={24} color="d" />}>Register</Button>
        </form>
      )
    }

    Contributing

    We welcome contributions to Pillar-ui, whether that’s through reporting issues, submitting feature requests, or contributing code. For More Information Check CONTRIBUTING.md file

    Roadmap

    We are constantly working to improve Pillar-ui and add new features to the library. Our roadmap includes plans to improve accessibility, add new components, and improve the documentation. We welcome feedback and suggestions from the community and encourage you to get involved in the development process.

    Security Policy

    Please see our Security Policy for information on how to report security vulnerabilities and our disclosure policy.

    Sponsor Pillar-ui

    If you find Pillar-ui useful and want to support its development and maintenance, you can consider sponsoring the project. Your sponsorship will help cover the costs of development, testing, documentation, and community support. It will also help us allocate more time and resources to improving and expanding the library.

    You can sponsor the project on GitHub Sponsors. GitHub Sponsors is a platform that enables you to support open source projects and contributors. You can choose to sponsor us monthly or with a one-time donation. Your sponsorship will be publicly recognized on our GitHub repository and website.

    Alternatively, you can also support the project by contributing code, reporting issues, and spreading the word about it. Every little bit helps and we appreciate all contributions, big and small.

    ko-fi

    Thank you for considering sponsoring Pillar-ui!

    License

    Pillar-ui is released under the MIT License.

    Visit original content creator repository

  • rPPG-heart-rate-estimation-deep-learning-method

    rPPG BASED HEART RATE ESTIMATION USING DEEP LEARNING

    In this project, we used MTTS-CAN toolbox for implementations of deep based methods.

    ABSTRACT

    Remote heart rate estimation is the measurement of heart rate without any physical contact with the patients. This is accomplished using remote photoplethysmography (rPPG). rPPG signals are usually collected using a video camera with a limitation of being sensitive to multiple contributing factors, such as different skin tones, lighting condition of environment and facial structure. There are multiple studies and generally two basic approaches in the literature to process and make sense of these signals: Firstly, we examined the traditional methods as CHROM DEHAN [1], ICA POH [2], GREEN VERCRUYSSE [3] and POS WANG [4]. Secondly, we examined MTTS-CAN [5], one of the deep learning methods. While we tried traditional methods with the UBFC [6] dataset, we ran deep learning methods with UBFC and PURE [7] datasets. When we used SNR [8] to calculate heart rate based on the Blood Volume Pulse (BVM) signal resulting from deep learning-based methods, we observed a significant improvement in some results. In summary, we concluded that deep learning-based methods play an important role in the development of rPPG technologies and their introduction into our daily lives.

    METHOD

    We planned to carry out our measurements with deep learning methods, which was our main approach. We hoped that deep learning reduced error rates as a result of these measurements. We used the model of MTTS-CAN to obtain the heart rate signals. This method processes RGB values captured by cameras with functions that also contain certain calculations for various external factors. These external factors include non-physiological variations such as the flickering of the light source, head rotation, and facial expressions. In this method, there are Temporal Shift Modules that will facilitate the exchange of information between frames. These modules provide superior performance in both latency and accuracy. MTTS-CAN also calculates the respiratory rate along with the heartbeat. Since respiration and pulse frequencies cause head and chest movements of the body, calculating these two values together had a great impact on the accuracy of the values compared to independently calculated models. [5]

    ARCHITECTURE

    Flowchart of the proposed algorithm

    RESULTS

    In the table, we could see the results of traditional methods which are CHROM DEHAN, ICA POH, GREEN VERCRUYSSE and POS WANG methods. In a deep learning-based method which is MTTS-CAN. For example, if we look at 17.avi for all methods, we calculated that deep learning has dropped below five. This result is quite good for us. When we look at the average RMSE values of these methods, we see that the deep learning-based method gives the best results because it has the lowest RMSE.

    CONCLUSION AND FUTURE WORK

    We worked with the traditional methods in the first term and worked with deep-based methods in the second term. According to the information from literature studies and our studies throughout the year, we can say that deep learning-based methods generally give more correct and faster results than traditional methods. In addition, when we used SNR to calculate heart rate based on the Blood Volume Pulse (BVP) signal resulting from deep learning-based methods, we observed a significant improvement in some results. As a result, we can say that deep learning-based methods play an important role in the development of rPPG technologies and their introduction into our daily lives. In the pandemic period, telehealth and remote health monitoring have become increasingly important and people widely expect that this will have a permanent effect on healthcare systems. These tools can help reduce the risk of discovering patients and medical staff to infection, make healthcare services more reachable, and allow doctors to see more patients. In this context, we believe that it will find a place both in health centres and in all kinds of electronic devices. As we can see from the technology news that comes out every day, leading universities of education and leading companies in technology have also concentrated on rPPG studies and both contribute to the literature with research to solve the problems in rPPG or develop new methods. In the next few years, it seems quite possible to open the front camera of our mobile phone and measure our heart rate while sitting at home. Of course, there is no limit to the number of applications to which this technology will be integrated.


    The project is developed by

    Supervised by Prof. Dr. Çiğdem EROĞLU ERDEM

    And this project was awarded the third best project. You can find all the details in our thesis.

    You can go to the first phase of the project from this link.


    [1] De Haan, G., & Jeanne, V. (2013). Robust pulse rate from chrominance-based rPPG. IEEE Transactions on Biomedical Engineering, 60(10), 2878-2886
    [2] Poh, M. Z., McDuff, D. J., & Picard, R. W. (2010) Non-contact, automated cardiac pulse measurements using video imaging and blind source separation. Optics express, 18(10), 10762-10774
    [3] Vercruysse, W., Svasand, L. O., & Nelson, J. S. (2008). Remote plethysmographic imaging using ambient light. Optics express, 16(26), 21434-21445.
    [4] W. Wang, A. C. den Brinker, S. Stuijk, and G. de Haan, “Algorithmic principles of remote ppg,” IEEE Transactions on Biomedical Engineering, vol. 64, no. 7, pp. 1479–1491, 2016
    [5] Xin Liu, Josh Fromm, Shwetak Patel, Daniel McDuff, “Multi-Task Temporal Shift Attention Networks for On-Device Contactless Vitals Measurement”, NeurIPS 2020, Oral Presentation (105 out of 9454 submissions)
    [6] S. Bobbia, R. Macwan, Y. Benezeth, A. Mansouri, J. Dubois, (2017), Unsupervised skin tissue segmentation for remote photoplethysmography, Pattern Recognition Letters
    [7] Stricker, R., Müller, S., Gross, H.-M. “Non-contact Video-based Pulse Rate Measurement on a Mobile Service Robot” in Proc. 23st IEEE Int. Symposium on Robot and Human Interactive Communication (Ro-Man 2014), Edinburgh, Scotland, UK, pp. 1056 – 1062, IEEE 2014
    [8] Remote Photoplethysmography Using Nonlinear Mode Decomposition, Halil Demirezen, Cigdem Eroglu Erdem Marmara University Department of Computer Engineering, Goztepe, Istanbul, Turkey, pp. 1060– 1064, 2018.

    POSTER

    Visit original content creator repository
  • multicounter

    MultiCounter

    A simple, elegant counter with support for counting multiple things at once.

    Joseph Hale's software engineering blog

    Installation

    Pip

    pip install multicounter

    Poetry

    poetry add multicounter

    Usage

    from multicounter import MultiCounter
    mc = MultiCounter()
    
    # Choose a name for your counter and start counting!
    mc.foo += 1
    
    # You can choose an initial value for a counter ...
    mc.bar = 42
    # ... and increment or decrement it however you like.
    mc.bar -= 4
    
    print(mc.get_counters())
    # {'foo': 1, 'bar': 38}

    Contributing

    See CONTRIBUTING.md

    The Legal Stuff

    `MultiCounter` by Joseph Hale is licensed under the terms of the Mozilla
    Public License, v 2.0, which are available at https://mozilla.org/MPL/2.0/.
    
    You can download the source code for `MultiCounter` for free from
    https://github.com/jhale1805/multicounter.
    

    TL;DR

    You can use files from this project in both open source and proprietary applications, provided you include the above attribution. However, if you modify any code in this project, or copy blocks of it into your own code, you must publicly share the resulting files (note, not your whole program) under the MPL-2.0. The best way to do this is via a Pull Request back into this project.

    If you have any other questions, you may also find Mozilla’s official FAQ for the MPL-2.0 license insightful.

    If you dislike this license, you can contact me about negotiating a paid contract with different terms.

    Disclaimer: This TL;DR is just a summary. All legal questions regarding usage of this project must be handled according to the official terms specified in the LICENSE file.

    Why the MPL-2.0 license?

    I believe that an open-source software license should ensure that code can be used everywhere.

    Strict copyleft licenses, like the GPL family of licenses, fail to fulfill that vision because they only permit code to be used in other GPL-licensed projects. Permissive licenses, like the MIT and Apache licenses, allow code to be used everywhere but fail to prevent proprietary or GPL-licensed projects from limiting access to any improvements they make.

    In contrast, the MPL-2.0 license allows code to be used in any software project, while ensuring that any improvements remain available for everyone.

    Visit original content creator repository
  • SoundRecorder

    SoundRecorder

    Some web applications require an MP3 recorder to record sound directly from the user. The sound is converted to mono MP3 format with an adjustable sample rate and bit rate to reduce the output file size.

    A page can contain several MP3 recorders that can be used interchangeably. The recording process can be paused and can be resumed to continue the recording process.

    Reqirement

    1. Lame
    2. jQuery 1.11.1

    Example

    <html>
    <head>
        <title>MP3 Recorder</title>
        <meta name="viewport" content="width=device-width, minimum-scale=1.0, maximum-scale=1.0, user-scalable=no">
        <link rel="stylesheet" type="text/css" href="css/css.css">
        <script type="text/javascript" src="https://cdnjs.cloudflare.com/ajax/libs/jquery/1.11.1/jquery.min.js"></script>
        <script type="text/javascript" src="js/lame.js"></script>
    	<script type="text/javascript" src="js/js.js"></script>
    </head>
    
    <body>
    <style type="text/css">
    .audio-tool-wrapper {
    	display:flex;
    	justify-content:center;
    }
    
    .audio-tool-wrapper > span {
    	width:100px;
    	margin:8px;
    	text-align:center;
    	position:relative;
    	display:block;
    }
    </style>
    
    <h1>MP3 Recorder</h1>
    	<div class="audio-recorder" data-question-id="12" data-audio-index="1">
        	<div class="audio-tool-wrapper">
            	<span><a class="audio-tool tool-browse" title="Pilih File Suara"><span></span></a></span>
            	<span><a class="audio-tool tool-record" title="Rekam Langsung"><span></span></a></span>
            	<span><a class="audio-tool tool-play" title="Dengarkan"><span></span></a></span>
            	<span><a class="audio-tool tool-stop" title="Hentikan"><span></span></a></span>
            	<span><a class="audio-tool tool-upload" title="Unggah Suara"><span></span></a></span>
            	<span><a class="audio-tool tool-download" title="Unduh Suara"><span></span></a></span>
            	<span><a class="audio-tool tool-delete" title="Hapus Suara"><span></span></a></span>
                <span><span class="tool-timer"><i></i></span></span>
            </div>
        </div>
    	<div class="audio-recorder" data-question-id="12" data-audio-index="2">
        	<div class="audio-tool-wrapper">
            	<span><a class="audio-tool tool-browse"><span></span></a></span>
            	<span><a class="audio-tool tool-record"><span></span></a></span>
            	<span><a class="audio-tool tool-play"><span></span></a></span>
            	<span><a class="audio-tool tool-stop"><span></span></a></span>
            	<span><a class="audio-tool tool-upload"><span></span></a></span>
            	<span><a class="audio-tool tool-download"><span></span></a></span>
            	<span><a class="audio-tool tool-delete"><span></span></a></span>
                <span><span class="tool-timer"><i></i></span></span>
            </div>
        </div>
    <script type="text/javascript">
    
    var audioRecorder = {
    	initialized:false,
    	recorder:[]
    };
    var params = {
    	bitrate:32,
    	sampleRate:44100,
    	timeLimit:1800,
    	uploadSound:function(audio, duration, index, questionID, audioIndex){
    		console.log(audio.src);
    		audioRecorder.recorder[index].beforeUpload();
    		setTimeout(function(){
    			audioRecorder.recorder[index].afterUpload();
    		}, 2000);
    		var url = audio.src;
    		$.ajax({
    			url:'upload-sound.php',
    			type:'POST',
    			dataType:"json",
    			data:{
    				sound_data:url,
    				question_id:questionID,
    				audio_index:audioIndex
    			},
    			success: function(data)
    			{
    				console.log('Uploaded');
    			}
    		});     
    	},
    	downloadSound:function(audio, duration, index, questionID, audioIndex)
    	{
    		console.log(audio.src);
    
    		//Create a URL to the blob.
    		/*
    		var url = window.URL.createObjectURL(blob);
    		window.open(url);
    		*/
    
    	},
    	nullAudio:function()
    	{
    		alert('Belum ada audio cuyy! Selesaikan rekaman dulu...');
    	},
    	stillRecording:function()
    	{
    		alert('Masih merekam cuyy! Selesaikan dulu yach...');
    	},
    	stillPlaying:function()
    	{
    		alert('Masih memutar cuyy! Ga boleh merekam dulu... Pause dulu kek, atau tunggu selesai...');
    	},
    	overLimit:function()
    	{
    		alert('Melebihi batas');
    	},
    	log:function(text)
    	{
    		console.log(text);
    	}
    };
    
    $(document).ready(function(e) {
    
    	$(document).on('click', '.audio-recorder .tool-browse', function(e)
    	{
    		var audioController = $(this).closest('.audio-recorder');
    		var idx = audioController.attr("data-index") || "";
    		if(idx == "")
    		{
    			var index = audioRecorder.recorder.length;
    			audioRecorder.recorder.push(new MP3Recorder(audioController, index, 'browse', params));
    		}
    		
    	});
    	
    	$(document).on('click', '.audio-recorder .tool-record', function(e)
    	{		
    		var audioController = $(this).closest('.audio-recorder');
    		var idx = audioController.attr("data-index") || "";
    		if(idx == "")
    		{
    			var index = audioRecorder.recorder.length;
    			audioRecorder.recorder.push(new MP3Recorder(audioController, index, 'record', params));
    		}
    	})	
    });
    
    </script>
    </body>
    </html>
    

    Visit original content creator repository

  • ESP32FileuploadServer

    ESP32 Local Webserver

    with SPIFFS Upload & MCP4725 Digital to Analog Transmission Routine

    Overview

    This repository contains a web application for ESP32 that enables users to upload, delete, download, and format files. Additionally, it includes a routine to transmit data from a medical dataset uploaded on the SPIFFS using an MCP4725 DAC peripheral.

    Screenshots

    Screenshot1 Screenshot2

    Structure

    1. The final deployed application can be found under V3/.
    2. Web application files (HTML/CSS/JS) are stored as a .h file under include/.
    3. The webserver and DAC routine application are located in src/.
    4. The maximum possible partition table for a 6MB ESP32 V2 is provided in no_ota_2_2.csv.
    5. PlatformIO configuration files for featheresp32 and adafruit_feather_esp32_v2 are available in platformio.ini.

    Tips if forking for your project

    1. There seems to be a limit to the amount of CSS that can be rendered at runtime when supplied using inline <style>. If your application requires elaborate CSS and/or frameworks, it’s recommended to load the files onto SPIFFS and reference them in your HTML.
    2. Since this project necessitated SPIFFS formatting capability, the HTML, CSS, and JS files are stored in app storage as header files. If this isn’t an issue for your project, it’s better to have separate .html, .css, and .js files in SPIFFS.
    3. The app will be served at http://"your-hostname". By default –> retia_cp200. Refer V3/retia.ino for complete wifi config details.
    4. The app also has an API through which you can access the app via serial. You can test it using Docklight etc.
    5. V5/ is a “serial” version of the app, without the web app capabilites. Think of it as a glorified DAC system hooked onto your PC. It has an API that can be used to transmit files directly via serial. Using com_script.py, you can trasmit your local file. The script allows you to change your COM port, file location etc. The idea behind this implementation is that now you have no limit on file that has to be trasmitted, as the file will be on your PC and not SPIFFS. Note: The script is configured to scale down DAC’s reference voltage of 3.3V to 3.0V. (See V5/retia.ino)

    Acknowledgement

    Parts of the SPIFFS upload mechanism are based on this repository.

    Visit original content creator repository