Author: 6mx52w8iwrv8

  • learn-webservices-jaxrpc

    Learn RPC-Based SOAP Web Services (JAX-RPC)

    Continuous Integration

    This project contains example code to demonstrate proficiency with RPC based, aka JAX-RPC, SOAP web services.

    Obviously, building JAX-RPC web services today is definitely not something you want to do. However, it isn’t unusual for a large company to buy some vendor package that has been around for a while and has never been updated to REST services. So you as a developer get stuck having to integrate with it by using its RPC web services.

    But never fear. Axis 1.4 is still quite adept at handling the task even though the Spring Framework has dropped support for RPC.

    This project contain three modules:

    • learn-webservices-jaxrpc-stubs
    • learn-webservices-jaxrpc-server
    • learn-webservices-jaxrpc-client

    The subject matter of this example is military aircraft: simply keeping track of the types of aircraft and their manufacturers.

    Stubs Module

    You might ask yourself, how do I know if I have an RPC Based WebService? Probably most simply because you see “RPC” in the wsdl file. Actually, just look at the binding style and use. They should say it is an RPC style and the message body is encoded. If the WSDL file says “document” and “literal” then it is not RPC, it is JAX-WS and you should see my other project for an example of that.

    The stubs module is responsible for running the WSDL to Java plug-in. When integrating with a vendor package it will likely have some method for you to get the WSDL file. You will want to properly configure the plug-in mappings so that you get decent looking code. Don’t accept the default “namespace to package name” mapping. Chances are it will give you a horrible looking package structure. Take the time to generate code in the proper packages.

    As a side note, many WSDL files from the early 2000s were based on OAGIS standards. You may have heard of noun and verb pairs. OAGIS is where this comes from. For more information on OAGIS, see this link: http://www.oagi.org/oagis/9.0/Documentation/Architecture.html

    My example WSDL file uses pairs, but not the actual OAGIS schemas. (Too big and bulky for an example). There are many standards for building an API, and this project isn’t about that. I’m not even going to discuss versioning, even though you see versions my example XSD and WSDL files.

    Server Module

    Implementing a JAX-RPC based service is rather stupid today, but I wanted an example to test against, so I had to implement one. It is interesting to see how well the Axis Servlet still plays well in a Spring Boot App. The only trouble I had is that Axis doesn’t quite understand Java 8 syntax, so just keep Java 8 syntax out of the Axis Service class and you should be fine. This is why there is both an AxisAircraftService and an AircraftService class.

    The service also has security on it because you will likely face that in an integration. It wouldn’t surprise me that login credentials actually go into the SOAP message as opposed to using basic authentication. My example just uses Basic Authentication.

    I also included a logging handler to print out the incoming and outgoing SOAP messages. You can use this for debugging purposes.

    Client Module

    The client and stubs module is really what you need for integration. The client module shows how to configure a client stub to invoke the service on an arbitrary URL with credentials versus what the you see in the WSDL file.

    Legacy Jakarta Support

    With the release of Jakarta EE 9, Axis, as is, no longer works on the modern app servers. However, the Eclipse Transformer can breathe new life into old frameworks. The learn-webservices-jaxrpc-legacy-axis and learn-webservices-jaxrpc-legacy-xml-rpc-api projects produce transformed JAR files that work against the new Jakarta namespace.

    Building and Running the Application

    Simply run “mvn clean package” (or install) to build the applications. There is a Spring Boot App for both the server and client.

    To run the server, run the following command from the top level directory of the project:

    java -jar learn-webservices-jaxrpc-server/target/learn-webservices-jaxrpc-server-0.0.2-SNAPSHOT.jar

    From another command line, you can run the client with

    java -jar learn-webservices-jaxrpc-client/target/learn-webservices-jaxrpc-client-0.0.2-SNAPSHOT.jar

    You should see the following output:

    =====================

    Ping Message

    =====================

    The server output should also display the REQUEST and RESPONSE messages. Certainly not exciting, so there are more interesting test cases in the server module.

    Future Work

    I want to add an example of an attachment.

    Attribution

    The learn-webservices-jaxrpc-server project contains a patch to the following code:

    http://svn.apache.org/viewvc/axis/axis1/java/tags/1.4/src/org/apache/axis/utils/bytecode/ParamNameExtractor.java?revision=1225645&view=markup

    This is done to work around a Java 11 compatibility issue.

    The learn-webservices-jaxrpc-legacy-axis project contains the deprecated HttpUtils code that is no longer part of Jakarta EE 10. The code came from here:

    https://raw.githubusercontent.com/javaee/servlet-spec/master/src/main/java/javax/servlet/http/HttpUtils.java

    Visit original content creator repository https://github.com/mpuening/learn-webservices-jaxrpc
  • locust.replay

    Visit original content creator repository
    https://github.com/Danielfenghk/locust.replay

  • plasma-cash

    Plasma Cash – ERC721/ERC20/ETH Supported

    Installation and Loom SDK integration

    To see the integrations run against the Loom SDK you must download the loom SDK, refer to https://loomx.io/developers/docs/en/basic-install-osx.html.

    Under the loom_test directory there are all the samples in Go, that directly interact with Loom SDK. If you have cloned the repo and go dependencies are not found, in loom_test try:

    export GOPATH=$GOPATH:`pwd`
    

    Demo Flow

    1. Alice registers and is given coins 1-5 from the token contract
    2. Alice deposits Coin 1, Coin 2, Coin 3 in the plasma chain
    3. 3 Deposit Blocks have been generated in the child chain, each one having 1 UTXO at slots 0,1,2 respectively
    4. Alice sends Coin 1 to Bob, adding the transaction to the current block.
    5. Operator calls submitBlock, checkpointing the block merkle root which includes the transaction that gives ownership to Charlie – At this point, both the child chain and the root chain, have checkpointed Alice’s transaction at block number 1000.
    6. Bob transfers the previous UTXO to Charlie and the operator submits that block as well
    7. Charlie tries to exit Coin 1, Alice & Bob do not challenge
    8. After the challenge period passes, Charlie is able to withdraw his coin

    Loom integration tests

    cd server
    npm install
    npm run test
    cd .. 
    
    cd loom_test
    make clean
    make deps
    make demos
    make contracts
    make test
    cd ..
    
    cd loom_js_test
    yarn
    yarn build
    yarn copy-contracts
    cd ..
    
    LOOM_BIN=<ABSOLUTE_PATH_TO_LOOM> ./loom_integration_test.sh
    

    License info

    Please note different directories have different licenses. Please see license file in each folder respectively

    All derivitive works of this code must incluse this copyright header on every file

    // Copyright Loom Network 2018 - All rights reserved, Dual licensed on GPLV3
    // Learn more about Loom DappChains at https://loomx.io
    // All derivitive works of this code must incluse this copyright header on every file 
    
    • server directory -> GPLv3 License
    • loom_test directory -> Loom Public License License

    Visit original content creator repository
    https://github.com/loomnetwork/plasma-cash

  • screenshot-to-code

    screenshot-to-code

    A simple tool to convert screenshots, mockups and Figma designs into clean, functional code using AI. Now supporting Claude Sonnet 3.5 and GPT-4o!

    Youtube.Clone.mp4

    Supported stacks:

    • HTML + Tailwind
    • HTML + CSS
    • React + Tailwind
    • Vue + Tailwind
    • Bootstrap
    • Ionic + Tailwind
    • SVG

    Supported AI models:

    • Claude Sonnet 3.5 – Best model!
    • GPT-4o – also recommended!
    • DALL-E 3 or Flux Schnell (using Replicate) for image generation

    See the Examples section below for more demos.

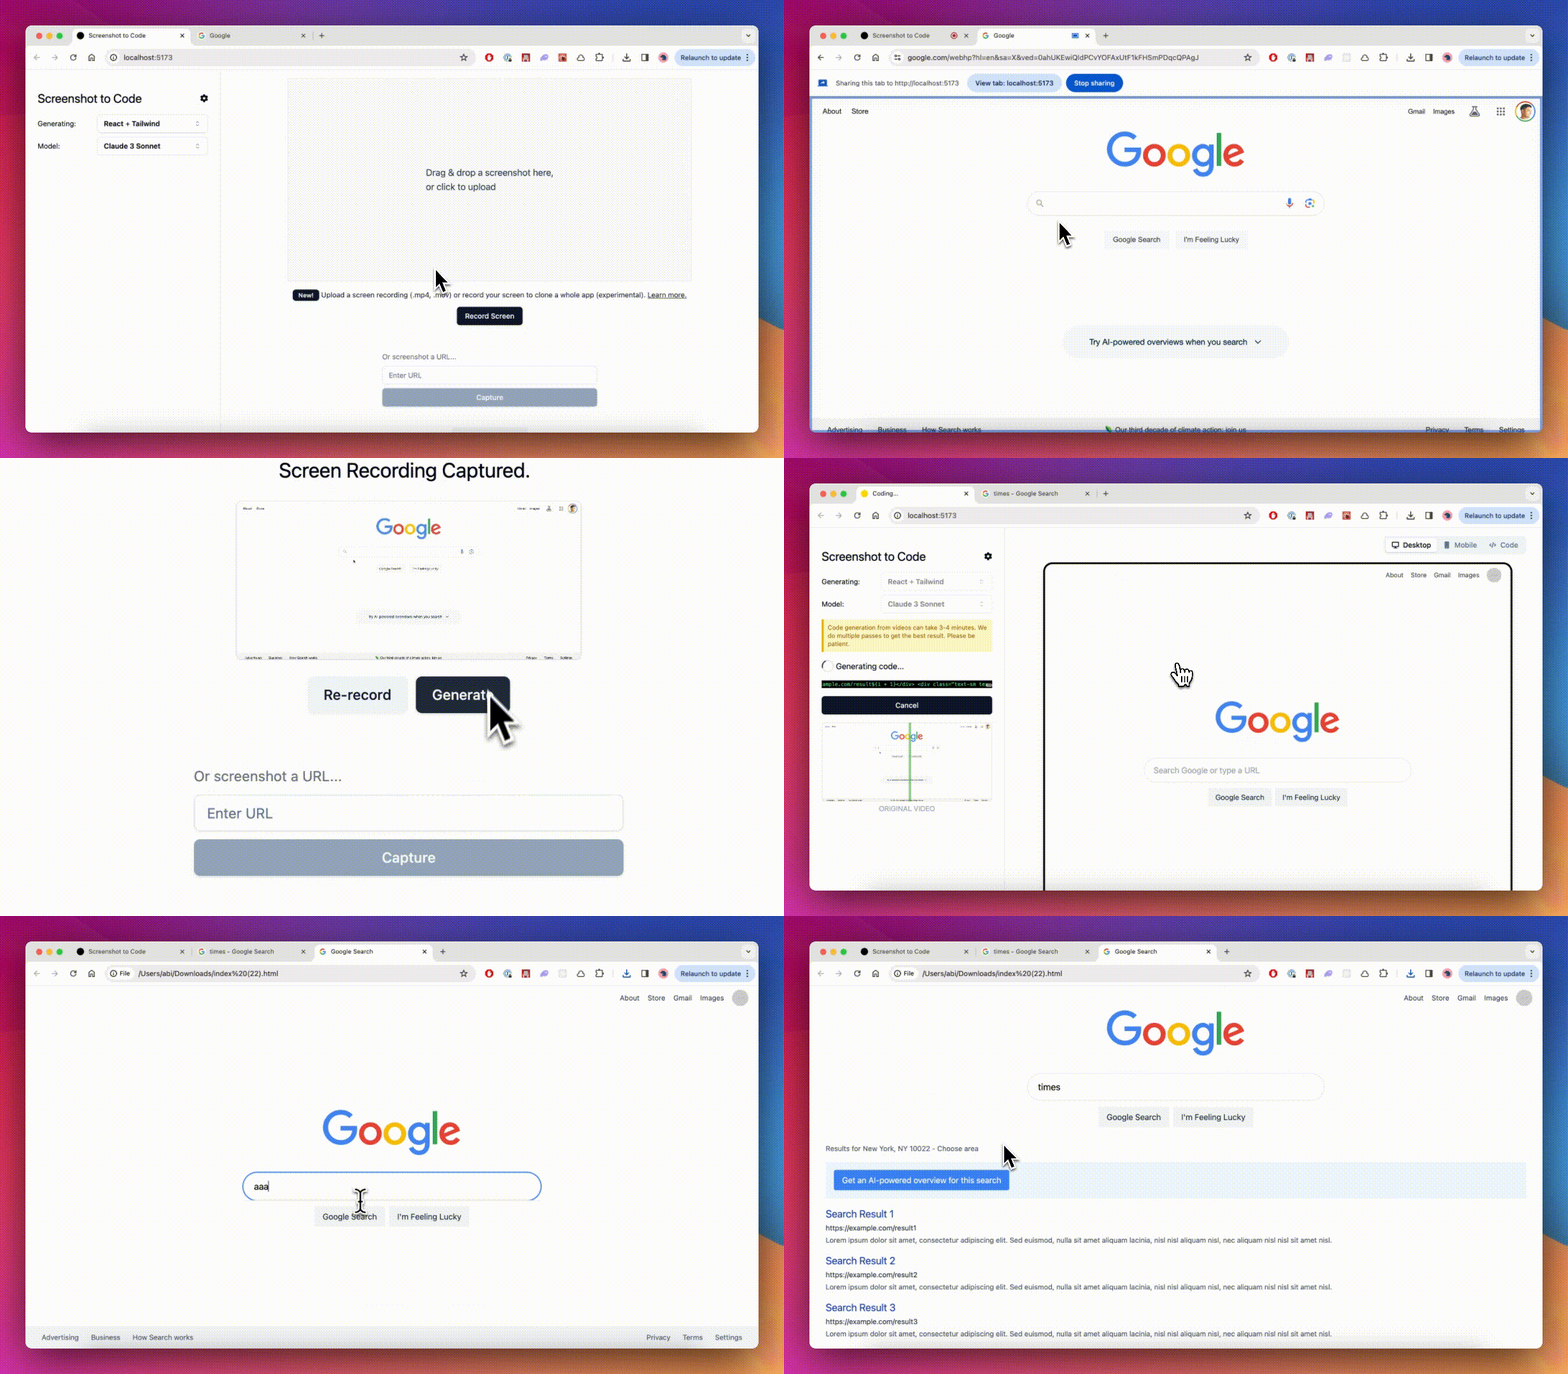
    We also just added experimental support for taking a video/screen recording of a website in action and turning that into a functional prototype.

    google in app quick 3

    Learn more about video here.

    Follow me on Twitter for updates.

    🚀 Hosted Version

    Try it live on the hosted version (paid).

    🛠 Getting Started

    The app has a React/Vite frontend and a FastAPI backend.

    Keys needed:

    If you’d like to run the app with Ollama open source models (not recommended due to poor quality results), follow this comment.

    Run the backend (I use Poetry for package management – pip install poetry if you don’t have it):

    cd backend
    echo "OPENAI_API_KEY=sk-your-key" > .env
    echo "ANTHROPIC_API_KEY=your-key" > .env
    poetry install
    poetry shell
    poetry run uvicorn main:app --reload --port 7001

    You can also set up the keys using the settings dialog on the front-end (click the gear icon after loading the frontend).

    Run the frontend:

    cd frontend
    yarn
    yarn dev

    Open http://localhost:5173 to use the app.

    If you prefer to run the backend on a different port, update VITE_WS_BACKEND_URL in frontend/.env.local

    For debugging purposes, if you don’t want to waste GPT4-Vision credits, you can run the backend in mock mode (which streams a pre-recorded response):

    MOCK=true poetry run uvicorn main:app --reload --port 7001

    Docker

    If you have Docker installed on your system, in the root directory, run:

    echo "OPENAI_API_KEY=sk-your-key" > .env
    docker-compose up -d --build

    The app will be up and running at http://localhost:5173. Note that you can’t develop the application with this setup as the file changes won’t trigger a rebuild.

    🙋‍♂️ FAQs

    • I’m running into an error when setting up the backend. How can I fix it? Try this. If that still doesn’t work, open an issue.
    • How do I get an OpenAI API key? See https://github.com/abi/screenshot-to-code/blob/main/Troubleshooting.md
    • How can I configure an OpenAI proxy? – If you’re not able to access the OpenAI API directly (due to e.g. country restrictions), you can try a VPN or you can configure the OpenAI base URL to use a proxy: Set OPENAI_BASE_URL in the backend/.env or directly in the UI in the settings dialog. Make sure the URL has “v1” in the path so it should look like this: https://xxx.xxxxx.xxx/v1
    • How can I update the backend host that my front-end connects to? – Configure VITE_HTTP_BACKEND_URL and VITE_WS_BACKEND_URL in front/.env.local For example, set VITE_HTTP_BACKEND_URL=http://124.10.20.1:7001
    • Seeing UTF-8 errors when running the backend? – On windows, open the .env file with notepad++, then go to Encoding and select UTF-8.
    • How can I provide feedback? For feedback, feature requests and bug reports, open an issue or ping me on Twitter.

    📚 Examples

    NYTimes

    Original Replica
    Screenshot 2023-11-20 at 12 54 03 PM Screenshot 2023-11-20 at 12 59 56 PM

    Instagram page (with not Taylor Swift pics)

    instagram.taylor.swift.take.1.mp4

    Hacker News but it gets the colors wrong at first so we nudge it

    hacker.news.with.edits.mp4

    🌍 Hosted Version

    🆕 Try it here (paid). Or see Getting Started for local install instructions to use with your own API keys.

    Visit original content creator repository https://github.com/isaccanedo/screenshot-to-code
  • ComfyUI_Comfyroll_CustomNodes

    🧩 Comfyroll Studio

    Co-authored by Suzie1 and RockOfFire

    Current version: 1.76

    Wiki

    Please use our new wiki for info on the custom nodes, and lots of examples of their use.

    https://github.com/Suzie1/ComfyUI_Comfyroll_CustomNodes/wiki

    Installation

    1. cd custom_nodes
    2. git clone https://github.com/Suzie1/ComfyUI_Comfyroll_CustomNodes.git
    3. Restart ComfyUI

    You can also install the nodes using the following methods:

    Patch Notes

    https://github.com/Suzie1/ComfyUI_Comfyroll_CustomNodes/blob/main/Patch_Notes.md

    List of Custom Nodes

    Core Nodes

    📦 Essential Nodes

    • CR Image Output (changed 18/12/2023)
    • CR Latent Batch Size
    • CR Prompt Text
    • CR Combine Prompt
    • CR Seed
    • CR Conditioning Mixer
    • CR Select Model (new 24/1/2024)
    • CR VAE Decode (new 24/1/2024)

    🔳 Aspect Ratio

    • CR Aspect Ratio
    • CR SDXL Aspect Ratio
    • CR SD1.5 Aspect Ratio
    • CR Aspect Ratio Banners (new 18/12/2023)
    • CR Aspect Ratio Social Media (new 15/1/2024)
    • CR Aspect Ratio For Print (new 18/1/2024)

    📜 List Nodes

    • CR Text List (new 19/12/2023)
    • CR Prompt List (new 1/1/2024)
    • CR Float Range List (new 25/12/2023)
    • CR Integer Range List (new 25/12/2023)
    • CR Load Text List (new 27/12/2023)
    • CR Binary To List (new 29/12/2023)
    • CR Text List To String (updated 30/12/2023)
    • CR Text Cycler (new 4/1/2024)
    • CR Value Cycler (new 4/1/2024)

    📜 List IO

    • CR Load Image List (new 23/12/2023)
    • CR Load Image List Plus (new 23/12/2023)
    • CR Load GIF As List (new 6/1/2024)
    • CR Font File List (new 18/12/2023)

    📜 List Utils

    • CR Batch Images From List (new 29/12/2023)
    • CR Intertwine_Lists (new 29/12/2023)
    • CR Repeater (new 15/1/2024)
    • CR XY Product (new 2/1/2024)
    • CR Text List To String (updated 30/12/2023)

    🌟 SDXL

    • CR SDXL Prompt Mix Presets
    • CR SDXL Style Text
    • CR SDXL Base Prompt Encoder

    💊 LoRA

    • CR Load LoRA
    • CR LoRA Stack
    • CR Apply LoRA Stack
    • CR Random LoRA Stack (new 18/12/2023)
    • CR Random Weight LoRA (new 18/12/2023)

    🕹️ ControlNet

    • CR Apply ControlNet
    • CR Multi-ControlNet Stack
    • CR Apply Multi-ControlNet Stack

    🚌 Bus

    • CR Data Bus In (new 12/1/2024)
    • CR Data Bus Out (new 12/1/2024)
    • CR 8 Channel In (new 12/1/2024)
    • CR 8 Channel Out (new 12/1/2024)

    ✈️ Module

    • CR Module Pipe Loader
    • CR Module Input
    • CR Module Output

    🛩️ Pipe

    • CR Image Pipe In
    • CR Image Pipe Edit
    • CR Image Pipe Out
    • CR Pipe Switch

    ⛏️ Model Merge

    • CR Model Stack
    • CR Apply Model Merge

    🔍 Upscale

    • CR Multi Upscale Stack
    • CR Upscale Image
    • CR Apply Multi Upscale

    📉 XY Grid

    • CR XY List
    • CR XY Interpolate
    • CR XY Index
    • CR XY From Folder
    • CR XY Save Grid Image
    • CR Image Output

    👾 Graphics Nodes

    👓 Graphics – Filter

    • CR Color Tint
    • CR Halftone Filter
    • CR Vignette Filter (new 21/12/2023)

    🌈 Graphics – Pattern

    • CR Halftone Grid
    • CR Color Bars
    • CR Style Bars
    • CR Checker Pattern
    • CR Polygons
    • CR Color Gradient
    • CR Radial Gradiant
    • CR Starburst Lines
    • CR Starburst Colors
    • CR Simple Binary Pattern
    • CR Binary Pattern

    🟡 Graphics – Pattern

    • CR Draw Shape (new 24/12/2023)
    • CR Draw Pie” (new 25/12/2023)
    • CR Random Shape Pattern” (new 25/12/2023)

    🔤 Graphics – Text

    • CR Overlay Text
    • CR Draw Text
    • CR Mask Text
    • CR Composite Text
    • CR Select Font

    👽 Graphics – Template

    • CR Simple Meme Template
    • CR Simple Banner
    • CR Comic Panel Templates
    • CR Simple Banner (new 18/12/2023)
    • CR Simple Image Compare (new 18/12/2023)
    • CR Thumbnail Preview (new 26/12/2023)
    • CR Seamless Checker (new 18/1/2023)

    🌁 Graphics – Layout

    • CR Image Panel
    • CR Page Layout
    • CR Image Grid Panel
    • CR Image Border
    • CR Feathered Border (new 21/12/2023)
    • CR Color Panel
    • CR Simple Text Panel
    • CR Half Drop Panel (new 23/1/2024)
    • CR Diamond Panel (new 24/1/2024)
    • CR Overlay Transparent Image
    • CR Select ISO Size (new 18/1/2023)

    🎥 Animation

    📋 Schedules

    • CR Simple Schedule
    • CR Central Schedule
    • CR Combine Schedules
    • CR Output Schedule To File
    • CR Load Schedule From File
    • CR Schedule Input Switch

    📑 Schedulers

    • CR Simple Value Scheduler
    • CR Simple Text Scheduler
    • CR Value Scheduler
    • CR Text Scheduler
    • CR Load Scheduled Models
    • CR Load Scheduled LoRAs
    • CR Prompt Scheduler
    • CR Simple Prompt Scheduler

    📝 Prompt

    • CR Keyframe List
    • CR Load Prompt Style
    • CR Encode Scheduled Prompts

    🔢 Interpolation

    • CR Gradient Float
    • CR Gradient Integer
    • CR Increment Float
    • CR Increment Integer
    • CR Interpolate Latents

    🛠️ Utils

    • CR Debatch Frames
    • CR Current Frame

    ⌨️ IO

    • CR Load Animation Frames
    • CR Load Flow Frames
    • CR Output Flow Frames

    🛠️ Utility Nodes

    🔢 Utils Index

    • CR Index
    • CR Index Increment
    • CR Index Multiply
    • CR Index Reset
    • CR Trigger

    🔧 Utils Conversion

    • CR String To Number (changed 18/12/2023)
    • CR String To Combo
    • CR Float To String
    • CR Float To Integer
    • CR Integer To String
    • CR String To Boolean (new 17/1/2024)

    🔀 Utils Logic

    • CR Image Input Switch
    • CR Image Input Switch (4 way)
    • CR Latent Input Switch
    • CR Conditioning Input Switch
    • CR Clip Input Switch
    • CR Model Input Switch
    • CR ControlNet Input Switch
    • CR VAE Input Switch
    • CR Text Input Switch
    • CR Text Input Switch (4 way)
    • CR Switch Model and CLIP

    🔂 Utils Process

    • CR Img2Img Process Switch
    • CR Hires Fix Process Switch
    • CR Batch Process Switch

    🎲 Utils Random

    • CR Random Hex Color
    • CR Random RGB
    • CR Random Multiline Values (updated 28/12/2023)
    • CR Random Multiline Colors (new 28/12/2023)
    • CR Random RGB Gradient
    • CR Random Panel Code (new 26/12/2023)

    🔤 Utils Text

    • CR Text (new 3/1/2024)
    • CR Multiline Text (new 24/12/2023)
    • CR Split String
    • CR Text Concatenate (new 2/1/2024)
    • CR Text Replace (new 8/1/2024)
    • CR Text Blacklist (new 13/1/2024)
    • CR Text Length (new 10/1/2024)
    • CR Text Operation (new 10/1/2024)
    • CR Save Text To File (new 27/12/2023)

    ⚙️ Conditional

    • CR Set Value On Boolean (new 29/12/2023)
    • CR Set Value On Binary (new 3/1/2024)
    • CR Set Value On String (new 9/1/2024)
    • CR Set Switch From String (new 17/1/2024)

    ⚙️ Utils Other

    • CR Value
    • CR Integer Multiple
    • CR Clamp Value (new 29/12/2023)
    • CR Math Operation (new 31/12/2023)
    • CR Get Parameter From Prompt (new 5/1/2024)
    • CR Select Resize Method (new 16/1/2024)

    Legacy

    💀 Legacy Nodes

    • CR Seed to Int
    • CR Aspect Ratio SDXL, replaced by CR SDXL Aspect Ratio
    • CR Image Size, replaced by CR Aspect Ratio
    • CR SDXL Prompt Mixer, replaced by CR SDXL Prompt Mix Presets

    Comfyroll Workflow Templates

    The nodes were originally made for use in the Comfyroll Template Workflows.

    Comfyroll Template Workflows

    Comfyroll Pro Templates

    Comfyroll SDXL Workflow Templates

    SDXL Workflow for ComfyUI with Multi-ControlNet

    SDXL and SD1.5 Model Merge Templates for ComfyUI

    Credits

    comfyanonymous/ComfyUI – A powerful and modular stable diffusion GUI.

    WASasquatch/was-node-suite-comfyui – A powerful custom node extensions of ComfyUI.

    TinyTerra/ComfyUI_tinyterraNodes – A selection of nodes for Stable Diffusion ComfyUI

    hnmr293/ComfyUI-nodes-hnmr – ComfyUI custom nodes – merge, grid (aka xyz-plot) and others

    SeargeDP/SeargeSDXL – ComfyUI custom nodes – Prompt nodes and Conditioning nodes

    LucianoCirino/efficiency-nodes-comfyui – A collection of ComfyUI custom nodes.

    SLAPaper/ComfyUI-Image-Selector – Select one or some of images from a batch

    pythongosssss/ComfyUI-Custom-Scripts – Enhancements & experiments for ComfyUI, mostly focusing on UI features

    bash-j/mikey_nodes – comfy nodes from mikey

    ltdrdata/ComfyUI-Impact-Pack

    Visit original content creator repository
    https://github.com/Suzie1/ComfyUI_Comfyroll_CustomNodes

  • taple-sdk-android

    TAPLE Sdk Android

    TAPLE (pronounced T+🍎 [‘tapəl]) stands for Tracking (Autonomous) of Provenance and Lifecycle Events. TAPLE is a permissioned DLT solution for traceability of assets and processes. It is:

    • Scalable: Scaling to a sufficient level for traceability use cases.
    • Light: Designed to support resource constrained devices.
    • Flexible: Have a flexible and adaptable cryptographic scheme mechanism for a multitude of scenarios.
    • Energy-efficient: Rust powered, TAPLE is sustainable and efficient from the point of view of energy consumption.

    This repository includes:

    • Scripts for cross-compiling TAPLE FFI for Android 64-bit architectures.
    • Kotlin library for using TAPLE FFI on Android. Includes an implementation of the TAPLE database interface using the Android SQLite libraries.
    • Examples of use of the library

    AGPL licensed

    Discover | Learn | Build | Code

    Build

    Building the library is optional. The library is distributed through Github releases.

    Requirements

    • Cross compilation
      • Rust. Minimium supported rust versión (MSRV) is 1.67
      • Cross
    • Java 17 or higher
    • Android development tools

    Download

    Clone TAPLE FFI and TAPLE SDK Android.

    git clone https://github.com/opencanarias/taple-ffi
    git clone https://github.com/opencanarias/taple-sdk-android

    Cross compilation

    Cross-compilation generates the TAPLE FFI library for the different supported architectures and the bindings for Kotlin. Check the FFI repository in case you need to install additional dependencies.

    cd taple-sdk-android/scripts
    ./setup.sh
    ./start.sh

    The resulting artifacts are automatically copied to their corresponding location in the sdk folder.

    Lib generation

    cd ../sdk
    ./gradlew assemble

    Once the process is finished, the resulting libraries will be available at ./TapleSDK/build/outputs/aar.

    Use

    Explore the examples folder to learn how to use TAPLE in your Android applications.

    Current limitations

    Mobile devices do not usually have a public IP address, which prevents another TAPLE node from making a direct P2P connection with them. This means that currently only use cases where the mobile device initiates the connection with other TAPLE nodes can be addressed.

    In the future TAPLE will be able to solve this problem by using Push Nodes and/or Hole Punching techniques.

    License

    This project is licensed under the AGPL license.

    Visit original content creator repository https://github.com/opencanarias/taple-sdk-android
  • hoc-form

    hoc-form • Travis Coveralls github npm license

    Tired of writing custom form validation on every project you might work on? Let’s try hocForm, form validation on React has rarely been so simple! 🤗

    Requirements

    hocForm needs at least react@16.3.1 and react-dom@16.3.1 to work.

    Installation

    Using npm:

    npm install --save hoc-form
    

    yarn add hoc-form works fine too!

    Usage

    import React from 'react';
    import hocForm, { Field } from 'hoc-form';
    
    // First, we need a input component to render our text field
    function Input({
      input = {},
      label = '',
      meta = {},
      placeholder = '',
      type = 'text',
    }) {
      return (
        <div>
          <label>
            {label}
          </label>
          <input
            placeholder={placeholder}
            type={type}
            {...input}
            onBlur={e => input.onBlur && input.onBlur(e.target.value)}
            onChange={e => input.onChange(e.target.value)}
          />
          {meta.error && <span>{meta.error}</span>}
        </div>
      );
    }
    
    // Then, we need to create our form component and its helpers
    const unavailableUsernames = [
      'elonmusk',
      'ironman',
      'lukeskywalker',
    ];
    
    function validateLogin(value = '') {
      if (value.trim() === '') {
        return Promise.reject('Please enter an username');
      }
    
      return unavailableUsernames.includes(value)
        ? Promise.reject('This username is unavailable')
        : Promise.resolve()
    }
    
    function validatePassword(value = '') {
      if (value.trim().length < 6) {
        return Promise.reject('Password must contain 6 characters or more');
      }
    
      return Promise.resolve();
    }
    
    function Form({ onSubmit }) {
      return (
        <form onSubmit={onSubmit} noValidate>
          <Field
            name="login"
            component={Input}
            props={{
              label: 'Login *',
              onBlur: value => validateLogin(value),
              placeholder: 'elonmusk',
              type: 'string',
            }}
          />
          <Field
            name="pwd"
            component={Input}
            props={{
              label: 'Password *',
              type: 'password',
            }}
          />
          <button type="submit">Sign up</button>
        </form>
      );
    }
    
    // Finally, an export of our wrapped form component
    // with a validation function
    export default hocForm({
      validate(values, props) {
        let errors = {};
        const errorCatcher = (key, callback, ...args) => (
          callback(values[key], args)
            .catch(error => ({ [key]: error }))
        );
    
        return Promise.all([
          errorCatcher('login', validateLogin),
          errorCatcher('pwd', validatePassword),
        ]).then((errors) => {
          const results = errors.reduce((acc, item) => ({ ...acc, ...item }), {});
          return Object.keys(results).length ? Promise.reject(results) : Promise.resolve();
        });
      }
    })(Form);

    Please check out the complete demo! 🚀

    API

    hocForm({ options })(MyFormComponent) => React.Component

    Renders your MyFormComponent contexted with hocForm.

    Two arguments are required:

    • An options object to define the validate function and optional initialValues
    • A form React.Component to render.

    options.validate(values, props) => Promise

    Validates the form on submit.

    Arguments:

    1. values (Object): An object containing all fields keys and their value.
    2. props (Object): An object containing all props provided to MyFormComponent.

    Returns:

    • A promise:
      • On success, your must return Promise.resolve()
      • In case of failure, your must return Promise.reject({}). The object parameter must contain every field key with its error (type of string or else, depends on how your components used with Field are designed).

    Example, with errors as strings:

    function validate(values, props) {
      let errors = {};
    
      if (values.username) {
        if (!props.isUsernameAvailable(values.username)) {
          errors = { ...errors, username: 'This username is unavailable' };
        }
      } else {
        errors = { ...errors, username: 'Please enter an username' };
      }
    
      if (!values.password) {
        errors = { ...errors, password: 'Please enter a password' };
      }
    
      return Object.keys(errors).length
        ? Promise.reject(errors)
        : Promise.resolve();
    }

    options.initialValues: Object

    Object containing all initial values following fields keys.

    Example:

    initialValues: {
      country: 'United Kingdom',
      phone: '+44',
    }

    MyFormComponent: React.Component

    A React.Component rendering a form including some hocForm.Field items.

    Example:

    function Form({ onSubmit }) {
      return (
        <form onSubmit={onSubmit} noValidate>
          <Field
            name="login"
            component={Input}
            props={{
              label: 'Login *',
              type: 'string',
            }}
          />
        />
      );
    }

    Please check out a complete example here.

    Field({ options }) => React.Component

    Renders a form field, contexted with hocForm.

    options.name: String

    The name used in your options.validate function.

    Example:

    <Field
      name="login"
    />

    options.component: React.Component

    The React.Component rendered by Field.

    Example:

    <Field
      component={Input}
    />

    options.props: Object

    The properties provided to the component parameter.

    Example:

    <Field
      props={{
        label: 'Login *',
        onBlur: (value, otherValues) => Promise.resolve(),
        placeholder: 'elonmusk',
        type: 'string',
      }}
    />

    Please check out a complete example here.

    Which extra-props my components receive from Field?

    Components used in Field must handle the two following properties: input and meta. Please check out the description below.

    input.onChange(value: *)

    Allows to dispatch the new value of the field to the hocForm state. With this, all you have to do is to run input.onChange(theNewValue) to allow hocForm to use this new value at validation.

    Example:

    function TextInput({
      input = {},
    }) {
      return (
        <input
          type="text"
          onChange={e => input.onChange(e.target.value)}
        />
      );
    }

    input.onBlur(value: *, values: Object) => Promise

    Allows to run a validation on blur, the onBlur callback setted as property of the Field.

    Example:

    function TextInput({
      input = {},
    }) {
      return (
        <input
          type="text"
          onBlur={e => input.onBlur && input.onBlur(e.target.value)}
        />
      );
    }

    Note: When Field runs the optional onBlur callback received from its props property, it runs this callback with two arguments:

    • value: *, which is the current value of the Field;
    • values: Object, object containing all fields keys with their respective value. As example, this argument can be useful if you need to compare a « confirmation password » field with a previous « create password » field.

    This callback must a return a Promise:

    • Promise.resolve() if this blur validation succeeds;
    • Promise.reject(error) in case of failure.

    Example:

    <Field
      name="confirmPwd"
      component={Input}
      props={{
        label: 'Password confirmation *',
        type: 'password',
        onBlur: (currentValue, values) => (
          currentValue.trim() !== values.firstPassword)
            ? Promise.reject('Please enter the same password as below')
            : Promise.resolve()
        ),
      }}
    />

    options.meta: Object

    Object containing about a potential error on the field.

    Example:

    function TextInput({
      meta = {},
      input = {},
    }) {
      return (
        <React.Fragment>
          <input
            type="text"
            onBlur={e => input.onBlur && input.onBlur(e.target.value)}
          />
          {meta.error && <span>{meta.error}</span>}
        </React.Fragment>
      );
    }

    Please check out a complete example here.

    License

    hocForm is MIT licensed.

    Visit original content creator repository https://github.com/pacdiv/hoc-form
  • laravel-conekta-webhooks

    Handle Conekta webhooks in a Laravel application

    Latest Version on Packagist Build Status Quality Score Total Downloads

    Conekta can notify your application of events using webhooks. This package can help you handle those webhooks. You can easily define jobs or events that should be dispatched when specific events hit your app.

    Installation

    You can install the package via composer:

    composer require yorchi/laravel-conekta-webhooks

    The service provider will automatically register itself.

    You must publish the config file with:

    $ php artisan vendor:publish --provider="\Yorchi\LaravelConektaWebhooks\LaravelConektaWebhooksServiceProvider" --tag="config"

    This is the content of the config file that will be published ar config/conekta-webhooks.php:

    return [
        /*
         * Here you can define the job that should be run when a certain webhook hits your
         * application.
         *
         * You can find a list of Conekta webhook types here:
         * https://developers.conekta.com/api#events
         */
        'jobs' => [
            // 'chargeCreated' => \App\Jobs\LaravelWebhooks\HandleCreatedCharge::class,
            // 'chargePaid' => \App\Jobs\LaravelWebhooks\HandlePaidCharge::class,
            // ...
        ],
    ];

    Finally, take care of the routing: At the Conekta notification settings you must configure at what url Conekta webhooks should hit your app. In the routes file of your app you must pass that route to Route::conektaWebhooks:

    Route::conektaWebhooks('webhook-route-configured-at-the-conekta-dashboard');

    Behind the scenes this will register a POST route to a controller provided by this package. Because Conekta has no way of getting a csrf-token, you must add that route to the except array of the VerifyCsrfToken middleware:

    protected $except = [
        'webhook-route-configured-at-the-conekta-dashboard',
    ];

    Usage

    Conekta will send out webhooks for several event types. You can find the full list of events types in the Conekta documentation.

    Unless something wrong, this package will respond with a 200 to webhook requests. Sending a 200 will prevent Conekta from resending the same event again.

    There are two ways this package enables you to handle webhook requests: you can opt to queue a job or listen to the events the package will fire.

    Handling webhook requests using jobs

    namespace App\Jobs;
    
    use Illuminate\Bus\Queueable;
    use Illuminate\Queue\SerializesModels;
    use Illuminate\Queue\InteractsWithQueue;
    use Illuminate\Contracts\Queue\ShouldQueue;
    use Yorchi\LaravelConektaWebhooks\ConektaWebhookCall;
    
    class HandleCreatedCharge implements ShouldQueue
    {
        use InteractsWithQueue, Queueable, SerializesModels;
    
        /** @var  \Yorchi\LaravelConektaWebhooks\ConektaWebhookCalll */
        public $webhookCall;
    
        public function __construct(ConektaWebhookCalll $webhookCall)
        {
            $this->webhookCall = $webhookCall;
        }
    
        public function handle()
        {
            // do your work here
    
            // you can access the payload of the webhook call with $this->webhookCall->payload
        }
    }

    We highly recommend that you make this job queueable, because this will minimize the response time of the webhook requests. This allows you to handle more oh dear webhook requests and avoid timeouts.

    After having created your job you must register it at the jobs array in the conekta-webhooks.php config file. The key should be the name of the conekta event type. The value should be the fully qualified classname.

    // config/conekta-webhooks.php
    
    'jobs' => [
        'chargeCreated' => \App\Jobs\ConektaWebhooks\HandleCreatedCharge::class,
    ],

    Note: The event type who Conekta send out is charge.created, all the event types, qill be converted to camelCase strings.

    Handling webhook requests using events

    Instead of queueing jobs to perform some work when a webhook request comes in, you can opt to listen to the events this package will fire. Whenever a valid request hits your app, the package will fire a conekta-webhooks:: event.

    The payload of the events will be the instance of ConektaWebhookCalll that was created for the incoming request.

    Let’s take a look at how you can listen for such an event. In the EventServiceProvider you can register listeners.

    /**
     * The event listener mappings for the application.
     *
     * @var  array
     */
    protected $listen = [
        'conekta-webhooks::chargeCreated' => [
            App\Listeners\MailOperators::class,
        ],
    ];

    Here’s an example of such a listener:

    namespace App\Listeners;
    
    use Illuminate\Contracts\Queue\ShouldQueue;
    use Yorchi\LaravelConektaWebhooks\ConektaWebhookCall;
    
    class MailOperators implements ShouldQueue
    {
        public function handle(ConektaWebhookCalll $webhookCall)
        {
            // do your work here
    
            // you can access the payload of the webhook call with `$webhookCall->payload`
        }
    }

    We highly recommend that you make the event listener queueable, as this will minimize the response time of the webhook requests. This allows you to handle more Oh Dear webhook requests and avoid timeouts.

    Using the ConektaWebhookCalll

    Like mentioned above your events or jobs will receive an instance of Yorchi\LaravelConektaWebhooks\ConektaWebhookCall

    You can access the raw payload by calling:

    $webhookCall->payload; // returns an array;

    Or you can opt to get more specific information:

    $webhookCall->rawType(); // returns the type of the webhook (eg: 'charge.created');
    $webhookCall->type(); // returns the parsed type of the webhook (eg: 'chargeCreated');
    $webhookCall->data(); // returns an array with all the data of the event;
    $webhookCall->object(); // returns an array with all the attribute of the current object (eg: 'charge');

    Testing

    composer test

    Changelog

    Please see CHANGELOG for more information what has changed recently.

    Contributing

    Please see CONTRIBUTING for details.

    Security

    If you discover any security related issues, please email j.andrade.dev@gmail.com instead of using the issue tracker.

    Credits

    License

    The MIT License (MIT). Please see License File for more information.

    Laravel Package Boilerplate

    This package was generated using the Laravel Package Boilerplate.

    Visit original content creator repository https://github.com/Yorchi/laravel-conekta-webhooks
  • ansible-consul-cluster

    ansible-consul-cluster

    The purpose of this repo is to provision out a 3-node Consul cluster. The
    inspiration behind this repo was a ready to roll Consul backend for Terraform.

    Assumptions

    The following list of assumptions are made but may be adjusted as neccessary.

    1. Functional vSphere environment including vCenter.
    2. Ubuntu (preferred) VM template available in vCenter.
    3. DHCP is available to assign IP addresses to VMs when they spin up.

    NOTE: If you need an easy way to provision vSphere templates checkout my repo
    Packer-For-vSphere-and-More.

    Requirements

    Create group_vars/all/accounts.yml with the following contents (adapt to your
    environment):

    ---
    # Defines Linux SSH password
    ansible_password: packer
    
    # Defines Linux SSH user
    ansible_user: packer
    
    # Defines vCenter password
    vcenter_password: VMw@re1!
    
    # Defines vCenter username
    vcenter_username: administrator@vsphere.local

    NOTE: The above file is excluded from version control to ensure that account
    info is not leaked. You can also use ansible-vault if needed but you will
    need to remove accounts.yml from .gitignore.

    Usage

    Spinning Up VMs

    Updating Variables

    You will first need to spin up 3 VMs for the Consul cluster. These VMs are to
    be provisioned in a vSphere environment.

    Modify the following to meet your environment requirements:

    1. group_vars/all/vms.yml
    2. group_vars/all/dns.yml
    3. group_vars/all/vcenter.yml

    You also will need to adjust the following for Consul.

    group_vars/consul_cluster/consul.yml:

    # Generated using 'uuidgen'
    # make sure to generate a new token and replace this one
    consul_acl_master_token: 7A993C85-1EA6-412D-85DB-DA14EFCD03AB
    
    # Generate using 'consul keygen'
    # make sure to generate a new key and replace this
    # also update key if you changed the it in your cluster via 'consul keyring',
    # otherwise the role may deploy an outdated key to additional nodes which then
    # can't join the cluster
    consul_encryption_key: OJVXXkKdwifyqc9BrDe1VQ==

    Spinning Up and Provisioning

    To spin up the VMs:

    provision_vms.yml:

    ansible-playbook provisioned_vms.yml

    After the VMs have been provisioned, hosts.inv will be populated to use as
    Ansible inventory.

    To provision the VMs:

    playbook.yml:

    ansible-playbook -i hosts.inv playbook.yml

    License

    MIT

    Author Information

    Larry Smith Jr.

    Visit original content creator repository
    https://github.com/mrlesmithjr/ansible-consul-cluster

  • sniff2ban

    Sniff2ban scans traffic through a given interface for nasties by performing
    real-time scanning of your network.
    
    Sites can be whitelisted.
    
    Usage:
    	sniff2ban [-d] [-k] [-s] [-t seconds] [-v] [-S program1] [-S program2...] [-w IPv4address1[/mask]] [-w IPv4address2[/mask]...] [-p pidfile] [-V] [-W] [ socket ] [ interface ]
    
    -d:	Block (iptables DROP) sites sending us malware
    -k:	Kill the program sending/receiving the malware (needs netstat which support -W)
    -m:	When --enable-dovecot-scanning or --enable-ssh-scanning is given, this
    		is the maximum number of incorrect password attempts. The
    		default is 3.
    -p:	Write a pidfile for monit(1) or puppet(1)
    -S:	Don't kill this program
    -s:	Don't drop ourself (i.e. whitelist "interface")
    -t:	Consider a connection to be closed after this number of seconds of
    		inactivity have elapsed (default 60).  If you see a lot of
    		'already exists' errors on the console you may like to consider
    		reducing this value, though don't reduce it too much or else
    		you could risk false negatives
    -T:	Temporary directory
    -v:	Verbose -vv for more verbosity
    -V:	Print the version of sniff2ban
    -w:	Don't block (whitelist) this IP address
    -W:	Don't scan whitelisted IP addresses
    socket:		Means to talk to clamd: /full/path/name OR hostname:port, if
    			not given it is determined from clamd.conf, if that file
    			exists
    interface:	Interface to listen to (e.g. eth0), if not given we try to
    			guess
    
    If "socket" and/or "interface" aren't given it will take a guess, but it may
    get them wrong so it's best to be explicit. LIBPCAP is needed to guess the
    interface.
    
    You are urged to keep this product up-to-date.  The best way is to checkout the
    latest version from the GIT repositary about once a day:
    	git clone https://github.com/nigelhorne/sniff2ban.git
    
    On systems other than Linux you must use libpcap.  On Linux it's use is
    encouraged but not mandatory. To use LIBPCAP on Debian Linux you must first
    install the libpcap-dev package; on Fedora you must first install the
    libpcap-devel package.
    If you don't install it, you'll need to give the interface argument.
    
    On Debian, netstat is provided by the net-tools package.
    
    Tested on Linux2.6, FreeBSD7.0, Solaris10, OpenBSD4.2 and NetBSD4.0.
    
    On Linux I have used both tinycc and gcc.
    
    To build with tinycc:
    	CFLAGS="-Wall -g -bt 20" CPPFLAGS= CXXFLAGS= CC=tcc ./configure
    	automake --add-missing
    	make
    	sudo make install
    
    On Solaris10 I have used cc and gcc. You can get libpcap and lsof from
    http://www.sunfreeware.com/.
    
    Whitelisted IPs are tracked and reported.
    
    I put this into /etc/rc.local (212.159.0.0 is my ISP which houses secondary MXs
    so I don't want to blacklist it):
    	sniff2ban -d -s -vv -w 212.159.0.0/19 -W /var/run/clamav/clamd.sock&
    
    If you're using TCP to connect to clamd you need to give a hostname:port pair,
    e.g. localhost:3310.
    
    Works well with the Sanesecurity signatures to stop spammers, see
    http://www.sanesecurity.co.uk/. Very often, after a spam is sent a copy of the
    same one is sent from the same client, sniff2ban will use your firewall to
    prevent that.
    
    Since the software plays around with system files you MUST run as root.
    
    To enable HTTP scanning on Debian:
    	./configure --enable-http-scanning=/etc/apache2/sites-enabled
    
    To enable Dovecot scanning on Debian:
    	./configure --enable-dovecot-scanning=/var/log/syslog
    
    There is also an --enable-ssh-scanning option, however I suggest you do NOT
    enable it for now because the code hasn't been hardened or optimised.
    	./configure --enable-ssh-scanning=/var/log/auth.log
    
    To enable SMTP brute force detection (not currently implemented)
    	./config --enable-smtp-scannint=/var/log/mail.log
    
    If you see lots of send errors, the chances are that clamd is timingout. In
    this case, increase ReadTimeout and CommandReadTimeout in clamd.conf to
    86400 (1 day) and restart clamd and sniff2ban.
    
    If you can't get configure && make to work because of an autoconf issue,
    try the following commands before rerunning configure:
    	autoscan
    	aclocal
    	autoheader
    	autoconf
    	automake
    	ln -s /usr/share/automake-1.16/compile .
    

    Visit original content creator repository
    https://github.com/nigelhorne/sniff2ban