Category: Blog

  • Audious

    Audious is a virtual assistant for music collections. Amongst other things, it provides the ability to manage albums by indicating the ones which are not in playlists. It also gives detailed statistics about a music collection, such as the number of artists and albums or the overall duration of a music category. It can also be used to sanitize playlists by showing corrupted or missing songs, and can export playlists in different formats, such as FLAC or MP3.

    🎶

    🧠 Broaden your musical horizons

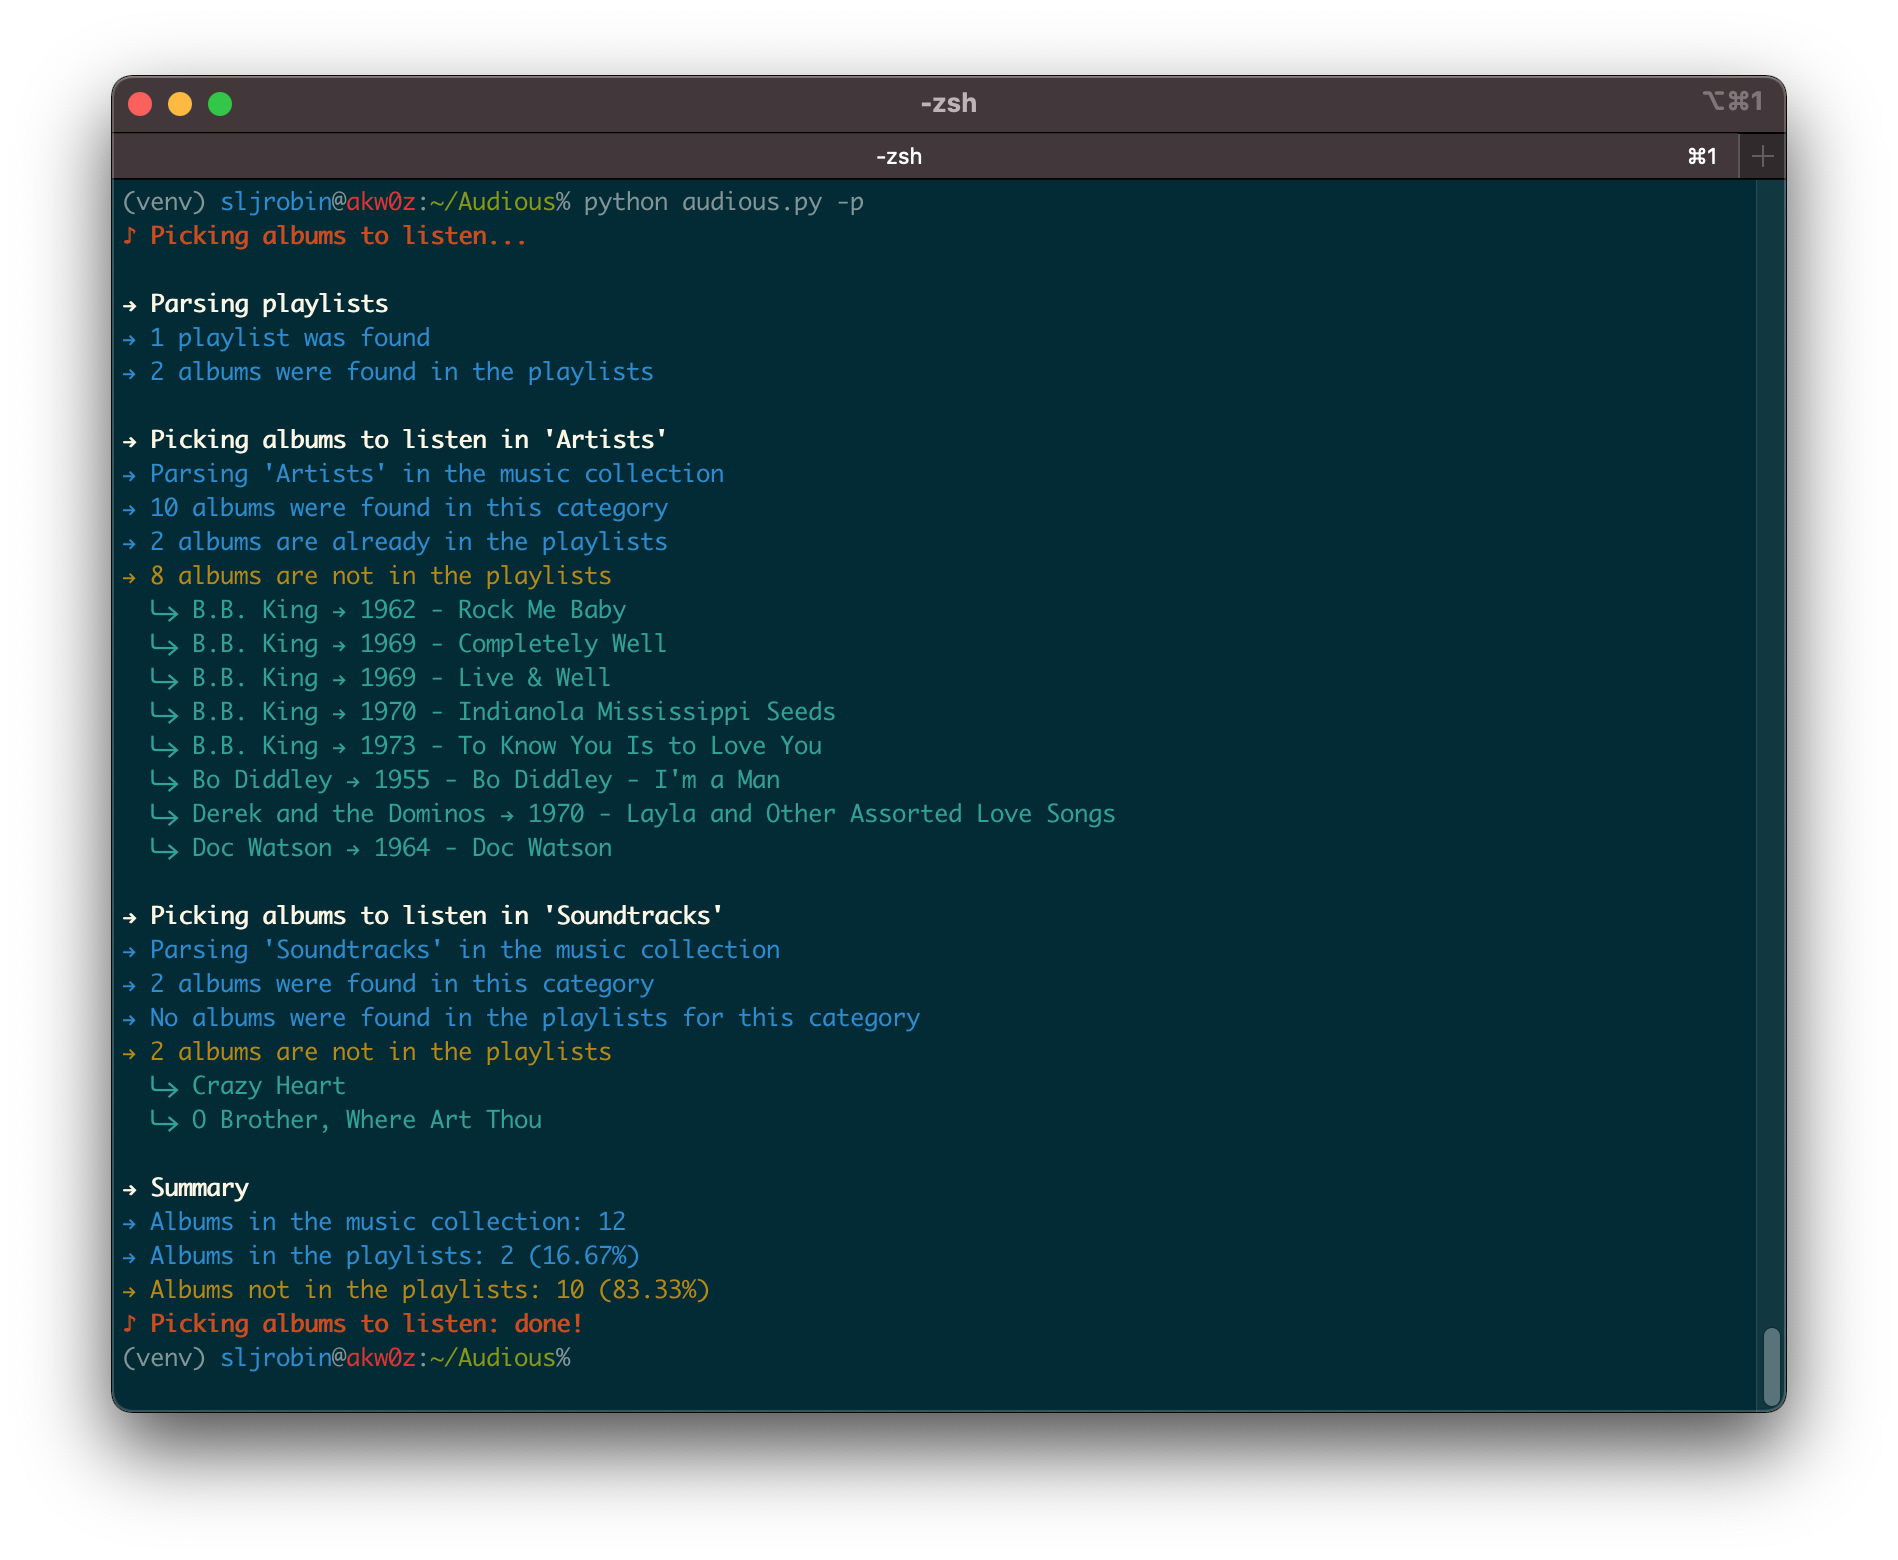
    The more your music collection will grow, the more it will be difficult to remember which albums and songs you liked or listened to. Playlists are there to help us reminding which songs or albums we liked. But there might be albums that you didn’t place in a playlist. Audious will help you managing the albums that are not present in your playlists.

    Display the albums that are not in your playlists, yet!

    🔎 Learn to know your music collection

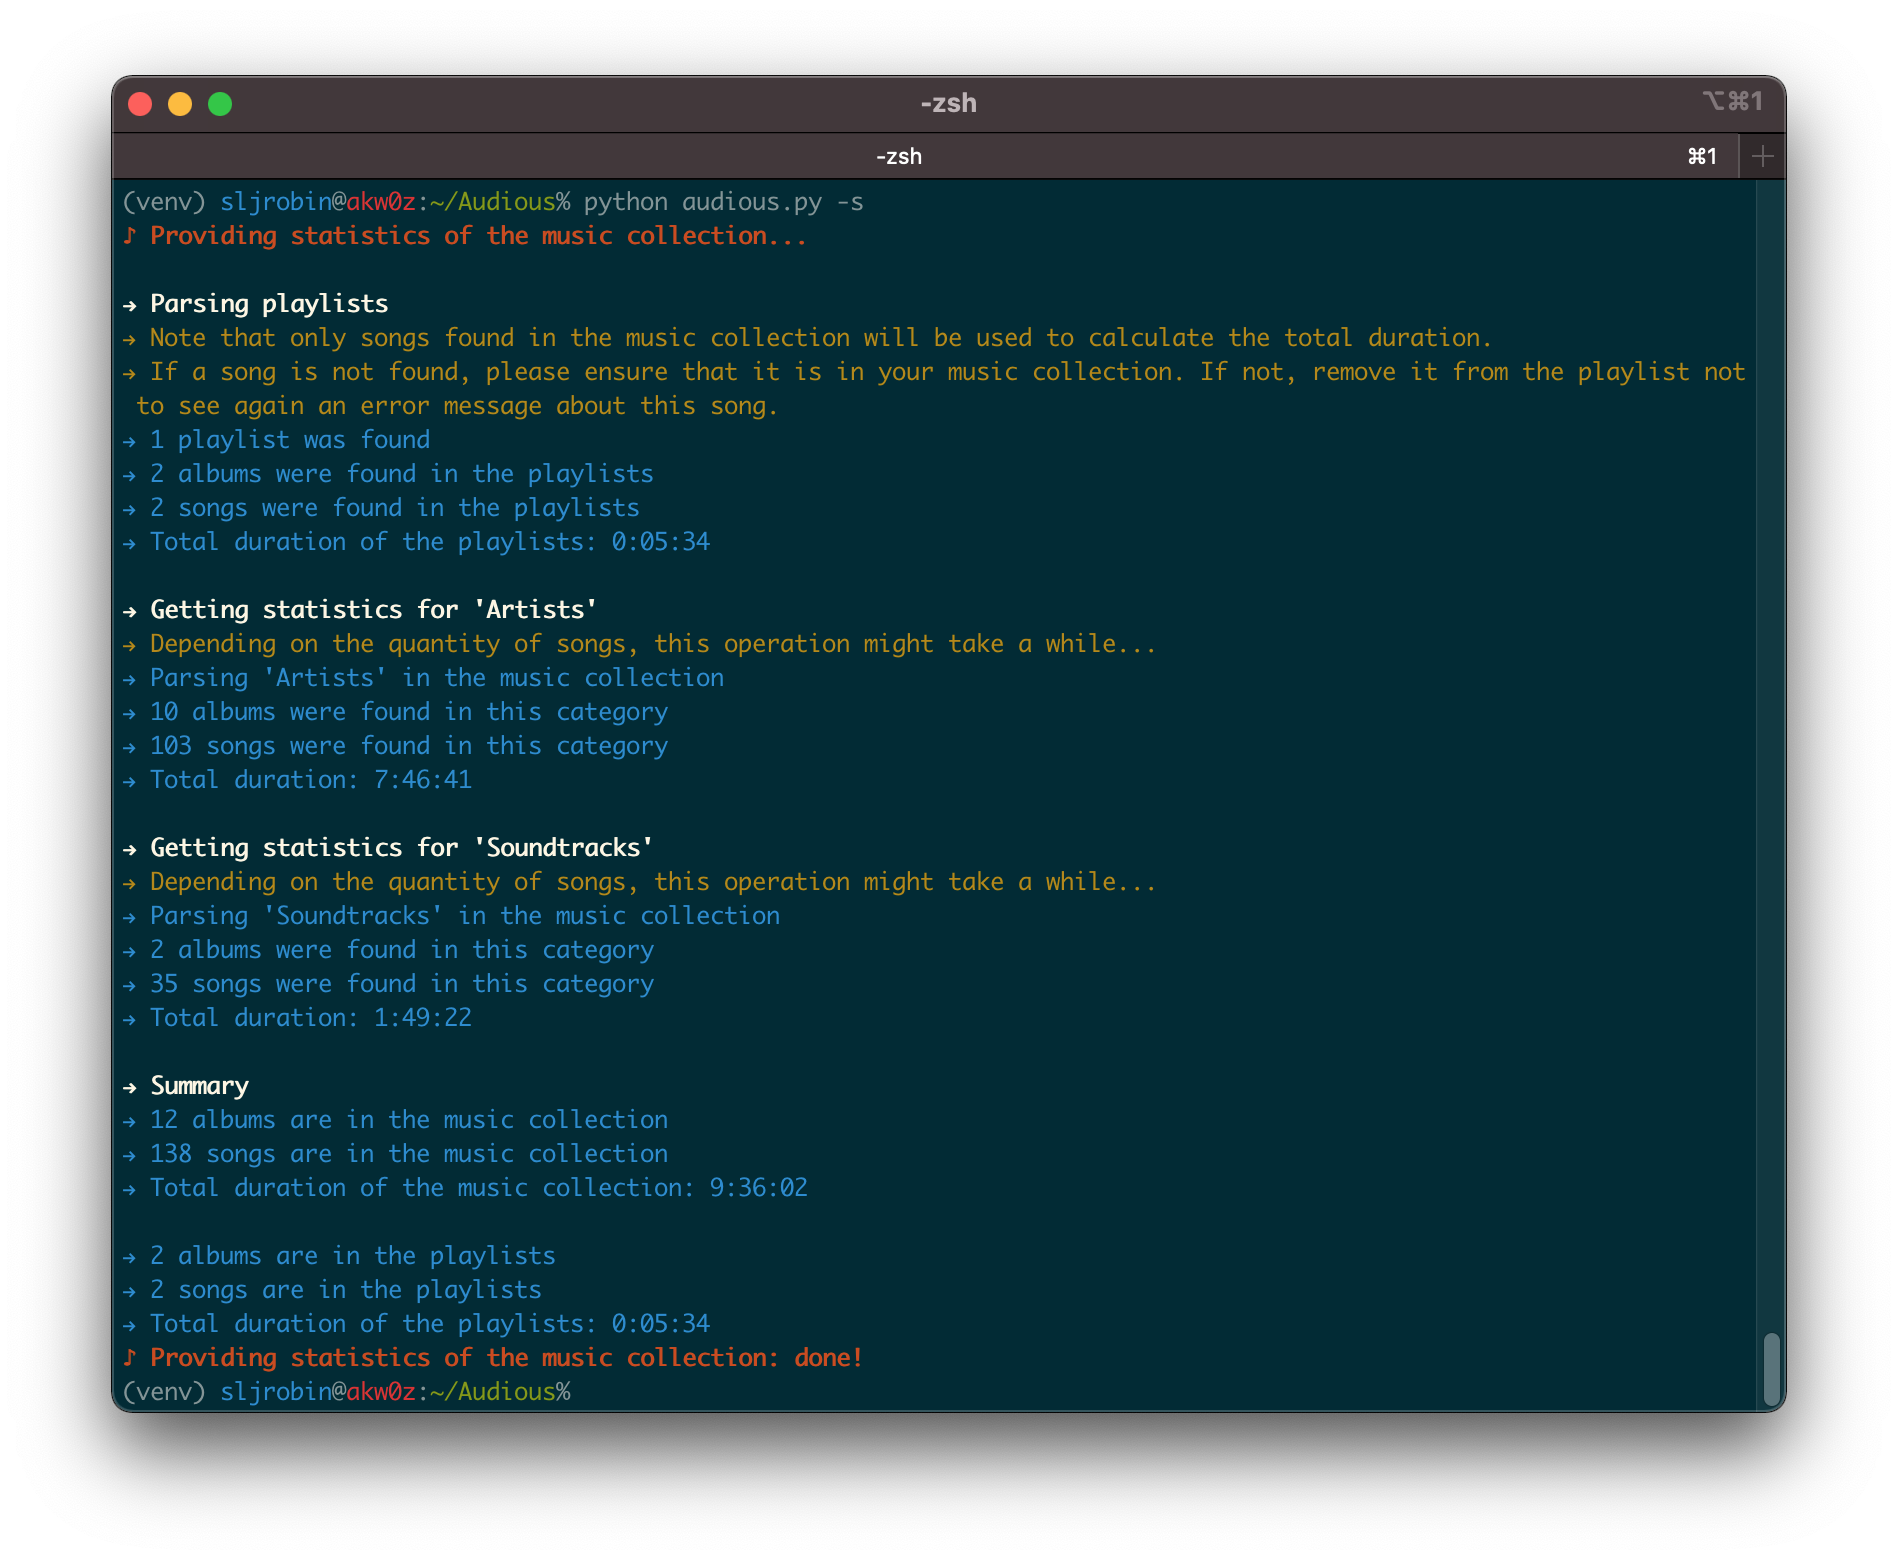
    Having information about the song currently being played or even the year of the album you want to listen to is easy. However, getting the number of artists and albums, or how finding long it would take you if you wanted to listen to your entire music collection, it’s a different story. Audious will give you statistics about your music collection as well as your playlists.

    Get statistics of your music collection but also of your playlists!

    ❤️ Less is more

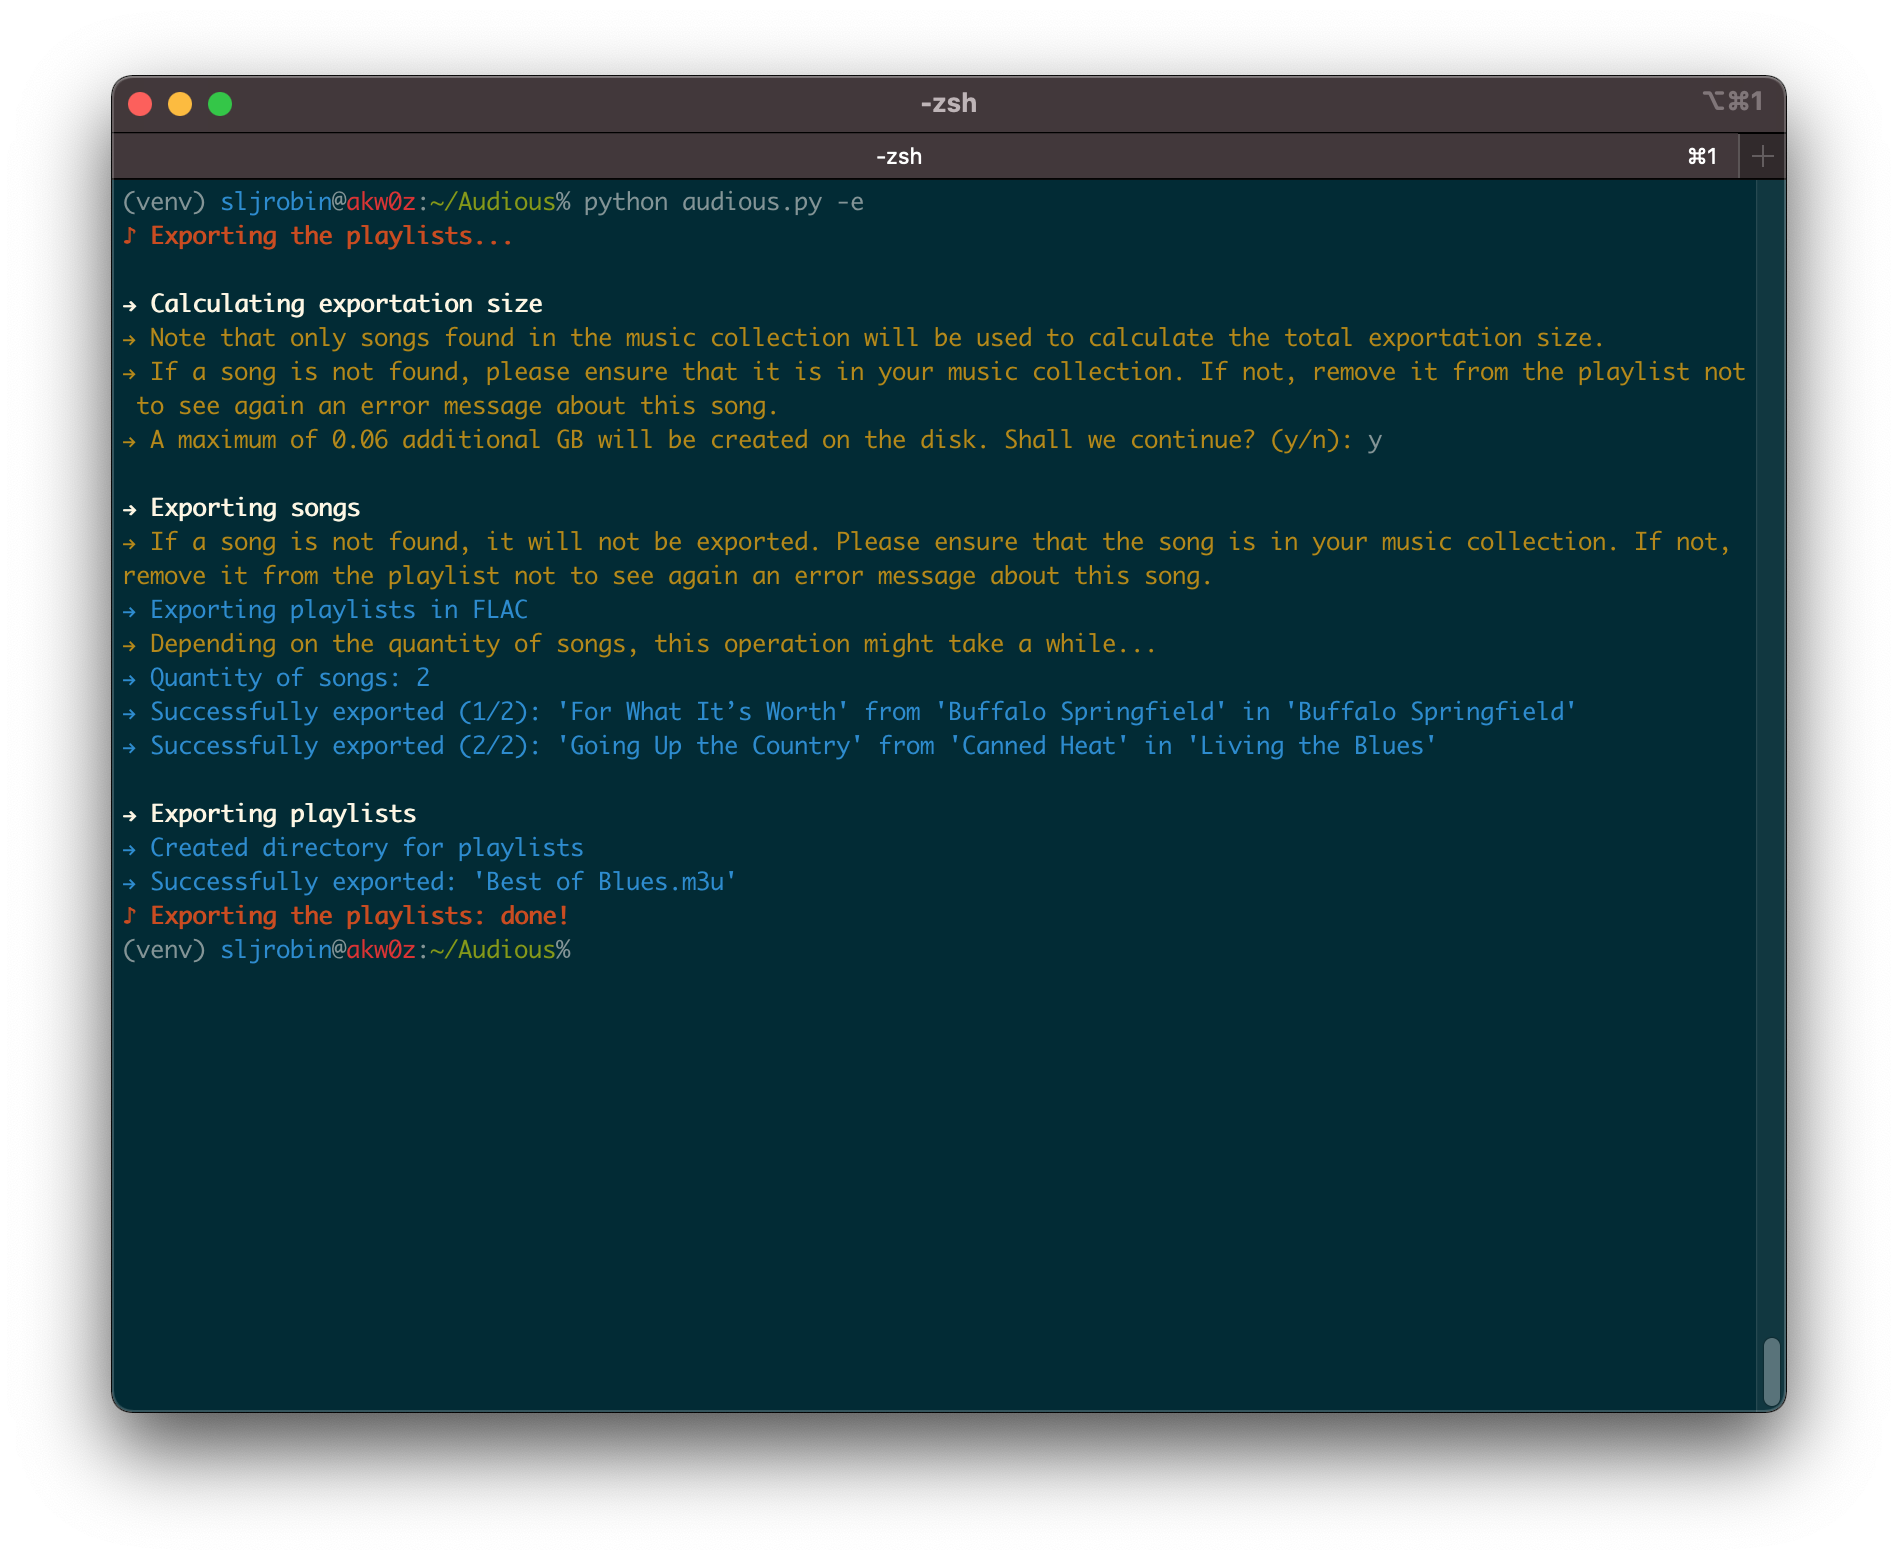
    Nowadays, space is cheap. But lossless music is still demanding in size. Having your entire music collection with you all the time on a phone might be impossible. Audious will export all the songs of your playlists and ensure that your favorite songs will always be with you. Export your playlists only to keep your favorite songs!

    🎶

    • Getting started: This section provides everything that is required to install Audious. It also shows how to setup it properly.
      1. Requirements
      2. Installation
      3. Edit the preferences
      4. Launching Audious
    • Tips: Several tips are given in this section to have a better user experience.
    • For Developers and Audiophiles: Audious has been designed as an open source project since day 1. This section clarifies the tool’s internals, explaining how to generate the source code documentation, and how the MP3 conversion is performed during the exportation process.
    • About: The origin of the project and the different licenses are detailed in this section.

    🎶

    Without music, life would be a mistake. — F. Nietzsche

    Getting started

    Requirements

    • A basic knowledge of lossless and lossy audio formats
    • A command line
    • Python 3
    • FFmpeg, which includes the FLAC and LAME packages
    • A music collection with FLAC songs
    • M3U playlists
    • A wish to organize a music collection with playlists

    Installation

    • Install FFmpeg and LAME on the OS:
      • On macOS: brew install ffmpeg lame
      • On Linux (Debian-based): sudo apt install ffmpeg lame
    • Clone this repository: git clone https://github.com/sljrobin/Audious
    • Go to the Audious directory: cd Audious/
    • Create and activate a Python virtual environment:
      • python3 -m venv venv
      • source ./venv/bin/activate
    • Install the requirements with pip3: pip install -r requirements.txt

    Edit the preferences

    • A preferences file, named preferences.json, is available under a preferences/ directory located at root of the repository. It needs to be properly configured before running Audious for the first time.
    • The file is presented as follow:
    {
      "collection": {
        "root": "",
        "playlists": "",
        "music": {
          "artists": "",
          "soundtracks": ""
        }
      },
      "exportation": {
        "root": "",
        "playlists": "",
        "format": ""
      }
    }
    • As it can be seen above, the file contains two main keys, collection and exportation.

    Music collection: collection

    The collection key gives details about the music collection:

    • root is the absolute path of the directory where is located the music collection
    • playlists is the directory containing all the playlists
    • music gives the different categories of the music collection. For instance:
      • artists is the directory that contains all the Artists of the music collection
      • soundtracks on the other hand, contains only soundtracks
      • Other music categories can be added under the music key (e.g. "spoken word": "Spoken Word/")
      • The artists and soundtracks keys are not mandatory, however, at least one key is required
    • Note: all given directories should have an ending / (e.g. Artists/, and not Artists)

    For instance, let’s suppose that a simple music collection is structured as follow:

    Collection/
    ├── Artists/
    ├── Playlists/
    └── Soundtracks/
    

    The collection key in preferences.json should be edited as shown below:

    "collection": {
      "root": "/Users/<username>/Music/Collection/",
      "playlists": "Playlists/",
      "music": {
        "artists": "Artists/",
        "soundtracks": "Soundtracks/"
    }

    Music exportation: exportation

    The exportation key gives details about the playlists exportation:

    • root is the absolute path of the directory where will be located the exported songs and playlists
    • playlists is the directory containing all the exported playlists
    • format is the format song for the playlists exportation; only two options are available: flac and mp3
    • Note: all given directories should have an ending / (e.g. Artists/, and not Artists)

    For instance, let’s suppose that we create an Export/ directory in the Collection/ and we want to export all the songs of the playlists in FLAC; the exportation key in preferences.json should be edited as shown below:

    "exportation": {
      "root": "/Users/<username>/Music/Collection/Export/",
      "playlists": "Playlists/",
      "format": "flac"
    }

    Launching Audious

    • Ensure first the Python virtual environment is enabled by running source ./venv/bin/activate
    • Run Audious: python audious.py --help
    % python audious.py --help
    usage: audious.py [-h] [-e] [-p] [-s]
    
    optional arguments:
      -h, --help    show this help message and exit
      -e, --export  Export the playlists in FLAC or in MP3
      -p, --pick    Pick the albums from the music collection that are not in the playlists
      -s, --stats   Provide statistics of the music collection and the playlists
    
    • Everything is now ready!

    Tips

    Handling long outputs

    Because Audious is capable of parsing big music collections, the generated outputs might be relatively long. As a result, it might be difficult to have a quick glance at the statistics of a category or at the albums that were picked without scrolling.

    An easy way to handle this scrolling issue is to combine Audious with the less command, as shown in the examples below:

    • python audious.py -s | less -R
    • python audious.py -p | less -R

    Press the space bar to switch to the next page on the terminal.

    Hidden files

    Hidden files on Linux or macOS are beginning with a dot (.). For instance, macOS creates lots of these files, called resource forks. As a result, an album with a song called 08 - High Voltage.flac might also contain a hidden file name ._08 - High Voltage.flac.

    Audious is capable of handling these hidden files; it will indicate that it is not a valid file and does not contain any valid metadata. Nevertheless, having these files might generate a lot of noise in Audious outputs with plenty of errors (e.g. The following song could not be parsed and will be ignored: [...]).

    To recursively remove these files and have clean outputs, go to the root of the music collection and use the following commands (Source):

    • To only display hidden files in the music collection:
    find /<path to music collection> -name '._*' -type f
    • To delete hidden files in the music collection:
    find /<path to music collection> -name '._*' -type f -delete

    For Developers and Audiophiles

    Code documentation

    • The source code of Audious has been thoroughly documented in order to help people adding new features or simply improving the code.
    • Because the code is commented, generating a documentation becomes easy.
    • Amongst most popular solutions, we recommend using pydoc for the documentation generation process.
    • Examples:
      • Generate the documentation for the Exporter() class: python -m pydoc lib/exporter.py
      • Generate the documentation for the entire library: python -m pydoc lib/*
      • Follow this tutorial for more information about pydoc
    • Snippet of the documentation for the lib/collection.py class:
    NAME
        collection
    
    CLASSES
        builtins.object
            Collection
    
        class Collection(builtins.object)
         |  Collection(display, preferences)
         |
         |  Methods defined here:
         |
         |  get_category_albums(self, category_songs)
         |      Open a category in the music collection and get a list of all the albums contained in this category.
         |      Handle macOS hidden files. Check the number of albums in the music category as well as in the music collection.
         |      Increment the total.
         |
         |      :param list category_songs: list of songs contained in a music category.
         |      :return list category_albums: list of albums contained in a music category.
         |
         |  get_category_songs(self, category, path)
         |      Open a category in the music collection and get a list of all the songs contained in this category. Select
         |      only .mp3 and .flac files with a regex.
         |
         |      :param str category: the music collection category name.
         |      :param str path: the path where the music collection category is located.
         |      :return list category_songs: list of songs contained in a music category.
    [...]
    

    MP3 conversion

    Ogg vs MP3

    • Ogg format offers a better sound quality compared to the MP3 format. (Source)
    • The MP3 format was chosen as the secondary format in the exportation options. This decision was made to ensure a better compatibility with devices (e.g. vintage audio systems, etc.).

    Command

    • A list of all FFmpeg parameters can be obtained with ffmpeg --help.
    • The MP3 conversion is performed via FFmpeg with the following command:
    ffmpeg -v quiet -y -i <song.flac> -codec:a libmp3lame -qscale:a 0 -map_metadata 0 -id3v2_version 3 <song.mp3>
    • The parameters that were used are detailed below. They were carefully selected by following the FFmpeg MP3 Encoding Guide.
      • -v quiet: does not produce any log on the console
      • -y: overwrites output files
      • -i <song.flac>: gives a song in FLAC as input (note: a full path is required)
      • -codec:a libmp3lame: specifies to use the libmp3lame codec
      • -qscale:a 0: controls quality, 0 being the lower value, it provides the higher quality possible
      • -map_metadata 0: properly maps the FLAC song metadata to the MP3 song metadata (Source)
      • -id3v2_version 3: selects ID3v2.3 for ID3 metadata
      • <song.mp3>: specifies the exported song in MP3 (note: a full path is required)

    MP3 encoding

    • VBR Encoding was preferred to CBR Encoding.
    • -qscale:a 0 is an equivalent of -V 0 and produces an average of 245 kbps for each exported song.
    • More information about the settings is available here.

    Metadata mapping

    About

    Audious

    The name “Audious” was taken from the HBO’s Silicon Valley. In this comedy television series, “Audious” is also a virtual assistant but seems to have more bugs!

    Licenses

    Visit original content creator repository
  • crnn-ctc

    «crnn-ctc» implemented CRNN+CTC

    ONLINE DEMO:LICENSE PLATE RECOGNITION

    Model ARCH Input Shape GFLOPs Model Size (MB) EMNIST Accuracy (%) Training Data Testing Data
    CRNN CONV+GRU (1, 32, 160) 2.2 31 98.570 100,000 5,000
    CRNN_Tiny CONV+GRU (1, 32, 160) 0.1 1.7 98.306 100,000 5,000
    Model ARCH Input Shape GFLOPs Model Size (MB) ChineseLicensePlate Accuracy (%) Training Data Testing Data
    CRNN CONV+GRU (3, 48, 168) 4.0 58 82.147 269,621 149,002
    CRNN_Tiny CONV+GRU (3, 48, 168) 0.3 4.0 76.590 269,621 149,002
    LPRNetPlus CONV (3, 24, 94) 0.5 2.3 63.546 269,621 149,002
    LPRNet CONV (3, 24, 94) 0.3 1.9 60.105 269,621 149,002
    LPRNetPlus+STNet CONV (3, 24, 94) 0.5 2.5 72.130 269,621 149,002
    LPRNet+STNet CONV (3, 24, 94) 0.3 2.2 72.261 269,621 149,002

    For each sub-dataset, the model performance as follows:

    Model CCPD2019-Test Accuracy (%) Testing Data CCPD2020-Test Accuracy (%) Testing Data
    CRNN 81.512 141,982 93.787 5,006
    CRNN_Tiny 75.729 141,982 92.829 5,006
    LPRNetPlus 62.184 141,982 89.373 5,006
    LPRNet 59.597 141,982 89.153 5,006
    LPRNetPlus+STNet 72.125 141,982 90.611 5,006
    LPRNet+STNet 71.291 141,982 89.832 5,006

    If you want to achieve license plate detection, segmentation, and recognition simultaneously, please refer to zjykzj/LPDet.

    Table of Contents

    News🚀🚀🚀

    Version Release Date Major Updates
    v1.3.0 2024/09/21 Add STNet module to LPRNet/LPRNetPlus and update the training/evaluation/prediction results on the CCPD dataset.
    v1.2.0 2024/09/17 Create a new LPRNet/LPRNetPlus model and update the training/evaluation/prediction results on the CCPD dataset.
    v1.1.0 2024/08/17 Update EVAL/PREDICT implementation, support Pytorch format model conversion to ONNX, and finally provide online demo based on Gradio.
    v1.0.0 2024/08/04 Optimize the CRNN architecture while achieving super lightweight CRNN_Tiny.
    In addition, all training scripts support mixed precision training.
    v0.3.0 2024/08/03 Implement models CRNN_LSTM and CRNN_GRU on datasets EMNIST and ChineseLicensePlate.
    v0.2.0 2023/10/11 Support training/evaluation/prediction of CRNN+CTC based on license plate.
    v0.1.0 2023/10/10 Support training/evaluation/prediction of CRNN+CTC based on EMNIST digital characters.

    Background

    This warehouse aims to better understand and apply CRNN+CTC, and has currently achieved digital recognition and license plate recognition. Meanwhile, LPRNet(+STNet) is a pure convolutional architecture for license plate recognition network. I believe that the implementation of these algorithms can help with the deployment of license plate recognition algorithms, such as on edge devices.

    Relevant papers include:

    1. Towards End-to-End License Plate Detection and Recognition: A Large Dataset and Baseline
    2. An End-to-End Trainable Neural Network for Image-based Sequence Recognition and Its Application to Scene Text Recognition
    3. Connectionist Temporal Classification: Labelling Unsegmented Sequence Data with Recurrent Neural Networks
    4. LPRNet: License Plate Recognition via Deep Neural Networks

    Relevant blogs (Chinese):

    1. Towards End-to-End License Plate Detection and Recognition: A Large Dataset and Baseline
    2. An End-to-End Trainable Neural Network for Image-based Sequence Recognition and Its Application to Scene Text Recognition
    3. LPRNet: License Plate Recognition via Deep Neural Networks

    Installation

    $ pip install -r requirements.txt

    Or use docker container

    $ docker run -it --runtime nvidia --gpus=all --shm-size=16g -v /etc/localtime:/etc/localtime -v $(pwd):/workdir --workdir=/workdir --name crnn-ctc ultralytics/yolov5:latest

    Usage

    Train

    # EMNIST
    $ python3 train_emnist.py ../datasets/emnist/ ./runs/crnn-emnist-b512/ --batch-size 512 --device 0 --not-tiny
    # Plate
    $ python3 train_plate.py ../datasets/chinese_license_plate/recog/ ./runs/crnn-plate-b512/ --batch-size 512 --device 0 --not-tiny

    Eval

    # EMNIST
    $ CUDA_VISIBLE_DEVICES=0 python eval_emnist.py crnn-emnist.pth ../datasets/emnist/ --not-tiny
    args: Namespace(not_tiny=True, pretrained='crnn-emnist.pth', use_lstm=False, val_root='../datasets/emnist/')
    Loading CRNN pretrained: crnn-emnist.pth
    crnn-emnist summary: 29 layers, 7924363 parameters, 7924363 gradients, 2.2 GFLOPs
    Batch:49999 ACC:100.000: 100%|████████████████████████████████████████████████████████| 50000/50000 [03:47<00:00, 219.75it/s]
    ACC:98.570
    # Plate
    $ CUDA_VISIBLE_DEVICES=0 python3 eval_plate.py crnn-plate.pth ../datasets/chinese_license_plate/recog/ --not-tiny
    args: Namespace(add_stnet=False, not_tiny=True, only_ccpd2019=False, only_ccpd2020=False, only_others=False, pretrained='crnn-plate.pth', use_lprnet=False, use_lstm=False, use_origin_block=False, val_root='../datasets/chinese_license_plate/recog/')
    Loading CRNN pretrained: crnn-plate.pth
    crnn-plate summary: 29 layers, 15083854 parameters, 15083854 gradients, 4.0 GFLOPs
    Load test data: 149002
    Batch:4656 ACC:100.000: 100%|████████████████████████████████████████████████████████████| 4657/4657 [00:52<00:00, 89.13it/s]
    ACC:82.147

    Predict

    $ CUDA_VISIBLE_DEVICES=0 python predict_emnist.py crnn-emnist.pth ../datasets/emnist/ ./runs/predict/emnist/ --not-tiny
    args: Namespace(not_tiny=True, pretrained='crnn-emnist.pth', save_dir='./runs/predict/emnist/', use_lstm=False, val_root='../datasets/emnist/')
    Loading CRNN pretrained: crnn-emnist.pth
    crnn-emnist summary: 29 layers, 7924363 parameters, 7924363 gradients, 2.2 GFLOPs
    Label: [0 4 2 4 7] Pred: [0 4 2 4 7]
    Label: [2 0 6 5 4] Pred: [2 0 6 5 4]
    Label: [7 3 9 9 5] Pred: [7 3 9 9 5]
    Label: [9 6 6 0 9] Pred: [9 6 6 0 9]
    Label: [2 3 0 7 6] Pred: [2 3 0 7 6]
    Label: [6 5 9 5 2] Pred: [6 5 9 5 2]

    $ CUDA_VISIBLE_DEVICES=0 python predict_plate.py crnn-plate.pth ./assets/plate/宁A87J92_0.jpg runs/predict/plate/ --not-tiny
    args: Namespace(add_stnet=False, image_path='./assets/plate/宁A87J92_0.jpg', not_tiny=True, pretrained='crnn-plate.pth', save_dir='runs/predict/plate/', use_lprnet=False, use_lstm=False, use_origin_block=False)
    Loading CRNN pretrained: crnn-plate.pth
    crnn-plate summary: 29 layers, 15083854 parameters, 15083854 gradients, 4.0 GFLOPs
    Pred: 宁A·87J92 - Predict time: 5.4 ms
    Save to runs/predict/plate/plate_宁A87J92_0.jpg
    $ CUDA_VISIBLE_DEVICES=0 python predict_plate.py crnn-plate.pth ./assets/plate/川A3X7J1_0.jpg runs/predict/plate/ --not-tiny
    args: Namespace(add_stnet=False, image_path='./assets/plate/川A3X7J1_0.jpg', not_tiny=True, pretrained='crnn-plate.pth', save_dir='runs/predict/plate/', use_lprnet=False, use_lstm=False, use_origin_block=False)
    Loading CRNN pretrained: crnn-plate.pth
    crnn-plate summary: 29 layers, 15083854 parameters, 15083854 gradients, 4.0 GFLOPs
    Pred: 川A·3X7J1 - Predict time: 4.7 ms
    Save to runs/predict/plate/plate_川A3X7J1_0.jpg

    Maintainers

    • zhujian – Initial workzjykzj

    Thanks

    Contributing

    Anyone’s participation is welcome! Open an issue or submit PRs.

    Small note:

    License

    Apache License 2.0 © 2023 zjykzj

    Visit original content creator repository
  • Learn-COBOL


    COBOLOGO.PNG

    Learning COBOL (programming language)

    This section will go over my knowledge of the COBOL programming language. I am not very experienced with it, and likely won’t dedicate too much time to it, since it is obsolete, and only used by dinosaur mainframe computers in businesses and governments who refuse to update from an 8 bit system while the rest of the world uses (rarely:32 bit) 64 bit and 128 bit systems. Enough bashing of the language with jargon terms, so far I actually like writing in it for some reason. It isn’t as productive as C or Python though, so I prefer to stick with a newer, modern language.

    Printing out to the screen in COBOL

    In COBOL, to print to the screen you use the DISPLAY keyword like so:

    DISPLAY "Sample text".

    Comments in COBOL

    COBOL comments are written like so:

    *> COBOL only supports single line comments

    Hello World in COBOL

    Out of this example, I can only memorize the DISPLAY keyword. Here is the standard Hello World program in COBOL

           IDENTIFICATION DIVISION.
           PROGRAM-ID. hello-world.
           PROCEDURE DIVISION.
               DISPLAY "Hello, world!"
               .

    End of line

    In COBOL, a . must be placed at the end of every line. It is the languages equivalent to a semicolon. It is done like so:

    DISPLAY "EOL".

    Other knowledge of the COBOL programming language

    1. COBOL stands for COmmon Business Oriented Language

    2. COBOL uses the .cob .cbl and .cpy file extension, and according to Notepad++ it also uses the .cdc file format.

    3. The Jargon file refers to COBOL as “a language for dinosaur computers”

    4. COBOL is considered archaic by its own developers since the 1970s (specifically after the release of the C programming language) but it is still used by too many industries (over 5 billion lines of code written annually, over 200 billion lines of COBOL in total)

    5. COBOL is NOT a semicolon and curly bracket language

    6. No other knowledge of the COBOL programming language.


    Visit original content creator repository

  • eKYC-ID-Card-Detection

    Pytorch Messenger Weights and Bias FastAPI Github OpenCV PostMan Skype GitLab LinkIn Docker Conda


    Hi, I’m Long, author of this repository 🚀.

    Logo

    YOLOV7-BASED VIETNAMESE ID CARD DETECTION

    Table of Contents
    1. About The Project
    2. Getting Started
    3. Roadmap
    4. Contributing
    5. Contact

    About The Project

    • In this day and age, we have many model detection such as Faster-RCNN, SDD, YOLO, and so on.
    • More specifically, we will apply the lastest version of YOLO, namely YOLOv7. In order to take ROI in ID Card, we additionally use Perspective Transform based on 4 orientations of image, namely top-left, top-right, bottom-left, bottom-right.
    • However, when we cut the ROI in image completely, the orientation of image is not correct. Moreover, many applications have used classification model to category the corners such as CNN, ResNet50, AlexNet, and so on. But this method will be low inference.
    • Therefore, we decide to apply mathematics so as to calculate the corner replied on the orientated vector of top-left and top-right that we will describe in this repository.

    Frameworks and Environments

    • Pytorch
    • FastAPI
    • OpenCV
    • Numpy

    Getting Started

    Prerequisites

    Logo

    First of all, we need to install anaconda environment.

    • conda
      conda create your_conda_environment
      conda activate your_conda_environment

    Then, we install our frameworks and libraries by using pip command line.

    • pip
      pip install -r path/to/requirements.txt

    We suggest that you should use python version 3.8.12 to implement this repository.

    Installation

    1. Check CUDA and install Pytorch with conda
      nvidia-smi
      conda install pytorch torchvision torchaudio cudatoolkit=11.3 -c pytorch
    2. Clone the repository
      git clone https://github.com/Syun1208/IDCardDetectionAndRecognition.git

    Implementation

    1. Preprocessing Data
    • Dataset size

          Total: 21777 images (100%)
          Train: 10888 images (50%)
          Val: 4355 images (20%)
          Test: 6534 (30%)
    • Data’s label structure.

      [    
        {
            "image": "/home/long/Downloads/datasets/version1/top_132045101_13680_jpg.rf.6d2adba419f676ee9bbab8c5a277a1b2.jpg",
            "id": 13946,
            "label": [
                {
                    "points": [
                        [
                            8.88888888888889,
                            36.796875
                        ],
                        [
                            86.25,
                            37.1875
                        ],
                        [
                            85.83333333333333,
                            64.765625
                        ],
                        [
                            9.305555555555555,
                            64.609375
                        ]
                    ],
                    "polygonlabels": [
                        "top-cmnd"
                    ],
                    "original_width": 720,
                    "original_height": 1280
                }
            ],
            "annotator": 9,
            "annotation_id": 16871,
            "created_at": "2022-09-27T11:06:56.424119Z",
            "updated_at": "2022-09-27T11:06:58.197087Z",
            "lead_time": 15.073
        }, 
        ......................
      ]
    • Folder structure trained on YOLOv7

        ├── test
        │   ├── images
        │   └── labels
        ├── train
        │   ├── images
        │   └── labels
        └── val
            ├── images
            └── labels
    • If you want custom datasets(json) to yolo’s bounding box, please run this command line.

      python path/to/data/preprocessing/convertJson2YOLOv5Label.py --folderBoundingBox path/to/labels --folderImage path/to/images --imageSaveBoundingBox path/to/save/visualization --jsonPath path/to/json/label 
    • If you want custom datasets(json) to yolo’s polygon and 4 corners of images, please run this command line.

      python path/to/data/preprocessing/convertJson2YOLOv54Corners.py --folderBoundingBox path/to/save/labels --folderPolygon path/to/save/labels --folderImage path/to/images --imageSaveBoundingBox path/to/save/visualization --imageSavePolygon path/to/save/visualization --jsonPath path/to/json/label
    • Padding your dataset containing image.

      python path/to/data/preprocessing/augment_padding_datasets.py --folder path/to/folder/images --folder_save --path/to/save/result
    1. Testing on local computer
    • Put your image’s option and run to see the result
      python path/to/main.py --weights path/to/weight.pt --cfg-detection yolov7 --img_path path/to/image 
    1. Testing on API
    • You need change your local host and port which you want to configure
      python path/to/fast_api.py --local_host your/local/host --port your/port
    1. Request to API
    • If you are down for requesting a huge of image to API, run this command
      python path/to/test_api.py --url link/to/api --source path/to/folder/images

    Roadmap

    • Data Cleaning
    • Preprocessing Data
    • Model Survey and Selection
    • Do research on paper
    • Configuration and Training Model
    • Testing and Evaluation
    • Implement Correcting Image Orientation
    • Build Docker and API using FastAPI
    • Write Report and Conclusion

    See the open issues for a full list of proposed features ( and known issues).

    Correcting Image Orientation

    Based on the predicted bounding box, we will flip the image with 3 cases 90, 180, 270 degrees by calculating the angle between vector Ox and vector containing coordinates top left and top right for vector AB with A as top left, B is the top right of the image as shown below.

    Logo

    Let’s assume that vector AB(xB – xA, yB-yA) is the combination between top_left(tl) and top_right(tr) coordination. Therefore, we will have the equation to rotate.

    Logo

    On the other hand, if the image has the angle which is different with zero and greater than 180 degrees, the image will be considered with the condition below to rotate suitably. Otherwise, the angle will be rotated following the figure above.

    Logo

    Logo

    Finally we will flip in an anti-clockwise angle.

    Results

    1. Polygon Detection

    Logo

    1. Correcting Image Rotation

    Logo

    1. Image Alignment

    Logo

    1. Results in API
      [
          {
              "image_name": "back_sang1_jpg.rf.405e033a9ecb2fb3593541e6ae20d056.jpg"
          },
          [
              {
                  "class_id": 0,
                  "class_name": "top_left",
                  "bbox_coordinates": [
                      11,
                      120,
                      111,
                      287
                  ],
                  "confidence_score": 0.76953125
              },
              {
                  "class_id": 1,
                  "class_name": "top_right",
                  "bbox_coordinates": [
                      519,
                      136,
                      636,
                      295
                  ],
                  "confidence_score": 0.85498046875
              },
              {
                  "class_id": 2,
                  "class_name": "bottom_right",
                  "bbox_coordinates": [
                      524,
                      383,
                      636,
                      564
                  ],
                  "confidence_score": 0.89697265625
              },
              {
                  "class_id": 3,
                  "class_name": "bottom_left",
                  "bbox_coordinates": [
                      41,
                      404,
                      104,
                      560
                  ],
                  "confidence_score": 0.7001953125
              }
          ],
          {
              "polygon_coordinates": {
                  "top_left": {
                      "x_min": 61.0,
                      "y_min": 203.5
                  },
                  "top_right": {
                      "x_max": 577.5,
                      "y_min": 215.5
                  },
                  "bottom_right": {
                      "x_max": 580.0,
                      "y_max": 473.5
                  },
                  "bottom_left": {
                      "x_min": 72.5,
                      "y_max": 482.0
                  }
              }
          }
      ]

    Contributing

    1. Fork the Project
    2. Create your Feature Branch
    • git checkout -b exist/folder
    1. Commit your Changes
    • git commit -m 'Initial Commit'
    1. Push to the Branch
    • git remote add origin https://git.sunshinetech.vn/dev/ai/icr/idc-transformation.git
    • git branch -M main
    • git push -uf origin main
    1. Open a Pull Request

    Contact

    My Information – LinkedInlongpm@unicloud.com.vn

    Project Link: https://github.com/Syun1208/IDCardDetectionAndRecognition.git

    Acknowledgments

    Visit original content creator repository