Distributed under a permissive BSD license, Chrono is an open-source multi-physics package used to model and simulate:
dynamics of large systems of connected rigid bodies governed by differential-algebraic equations (DAE)
dynamics of deformable bodies governed by partial differential equations (PDE)
granular dynamics using either a non-smooth contact formulation resulting in differential variational inequality (DVI) problems or a smooth contact formulation resulting in DAEs
fluid-solid interaction problems whose dynamics is governed by coupled DAEs and PDEs
first-order dynamic systems governed by ordinary differential equations (ODE)
sensors (camera, LiDAR, GPS, IMU, SPAD) to support simulation in robotics and autonomous agents via a ROS2 interface
Chrono provides a mature and stable code base that continues to be augmented with new features and modules. The core functionality of Chrono provides support for the modeling, simulation, and visualization of rigid and flexible multibody systems with additional capabilities offered through optional modules. These modules provide support for additional classes of problems (e.g., granular dynamics and fluid-solid interaction), modeling and simulation of specialized systems (such as ground vehicles and robots), co-simulation, run-time visualization, post-processing, interfaces to external linear solvers, or specialized parallel computing algorithms (multi-core, GPU, and distributed) for large-scale simulations.
Used in many different scientific and engineering problems by researchers from academia, industry, and federal government, Chrono has mature support for multibody dynamics, finite element analysis, granular dynamics, fluid-solid interaction, ground vehicle simulation, robotics, embodied AI, and terramechanics.
Implemented almost entirely in C++, Chrono also provides Python and C# APIs. The build system is based on CMake. Chrono is platform-independent and is actively tested on Linux, Windows, and MacOS using a variety of compilers.
A Mediator implementation for Dart inspired by MediatR.
This package provides a simple yet configurable solution.
Features
Request/Response
Commands
Request/Command Pipelines
Events
Event Observers
Sending events
An event can have multiple handlers. All handlers will be executed in parallel (by default).
import'package:dart_mediator/mediator.dart';
/// Strongly typed event class containing the event data./// All events must implement the [DomainEvent] interface.classMyEventimplementsDomainEvent {}
Future<void> main() async {
final mediator =Mediator.create();
// Subscribe to the event.
mediator.events.on<MyEvent>()
.subscribeFunction(
(event) =>print('event received'),
);
// Sends the event to all handlers.// This will print 'event received'.await mediator.events.dispatch(MyEvent());
}
Sending Commands
A command can only have one handler and doesn’t return a value.
/// This command will not return a value.classMyCommandimplementsCommand {}
classMyCommandHandlerimplementsCommandHandler<MyCommand> {
@overrideFutureOr<void> handle(MyCommand request) {
// Do something
}
}
Future<void> main() async {
final mediator =Mediator.create();
mediator.requests.register(MyCommandHandler());
/// Sends the command request. Return value is [void].await mediator.requests.send(MyCommand());
}
Sending Requests
A request can only have one handler and returns a value.
import'package:dart_mediator/mediator.dart';
classSomething {}
/// This query will return a [Something] object.classMyQueryimplementsQuery<Something> {}
classMyQueryHandlerimplementsQueryHandler<Something, MyQuery> {
@overrideFutureOr<Something> handle(MyQuery request) {
// do somethingreturnSomething();
}
}
Future<void> main() async {
final mediator =Mediator.create();
mediator.requests.register(MyQueryHandler());
// Sends the query request and returns the response.finalSomething response =await mediator.requests.send(MyQuery());
print(response);
}
Event Observers
An observer can be used to observe events being dispatched, handled or when an error occurs. For example logging events.
classLoggingEventObserverimplementsEventObserver {
/// Called when an event is dispatched but before any handlers have /// been called.@overridevoidonDispatch<TEvent>(
TEvent event,
Set<EventHandler> handlers,
) {
print(
'[LoggingEventObserver] onDispatch "$event" with ${handlers.length} handlers',
);
}
/// Called when an event returned an error for a given handler.@overridevoidonError<TEvent>(
TEvent event,
EventHandler handler,
Object error,
StackTrace stackTrace,
) {
print('[LoggingEventObserver] onError $event -> $handler ($error)');
}
/// Called when an event has been handled by a handler.@overridevoidonHandled<TEvent>(
TEvent event,
EventHandler handler,
) {
print('[LoggingEventObserver] onHandled $event -> $handler');
}
}
voidmain() {
final mediator =Mediator.create(
// Adds the logging event observer.
observers: [LoggingEventObserver()],
);
// Dispatch an event.
}
Request/Command Pipeline Behavior
A pipeline behavior can be used to add cross cutting concerns to requests/commands. For example logging.
This project is a Python script that enables you to download tagged images from Imgur.
Download Modes
This script supports two download modes: sequential and threaded.
Sequential: In this mode, images are downloaded one after another using only the main thread of the process.
Threaded: This mode creates multiple threads to download images concurrently.
The script measures and logs the time taken to download the images in both modes. This enables you to see the effect of using the different modes and different numbers of threads on the script’s performance.
Requirements
The project’s only dependency is the requests module, which can be installed using pip:
Examples of Imgur tags you can use include: astronomy, cats, cars, nature, earth.
Notes
The downloaded images will be saved in an images directory in the same location as the script. Each run will save its images in a new directory with the current time stamp. For tags with multiple images, each image will be saved in a separate directory within this top-level directory.
Number or letter sequences are easy to obtain when you are only interested in sequence of numbers (ascending or descending) that follow
a predefined order, for example decimal numbers 0,1,2,3,4,5,6,7,8,9 always follow that order, the number 1 will follow the number 0, the number 3 will follow the number 2.
Other numbers of larger quantities also follow the same order of formation, all are composed of digits between 0 and 9. This same feature for sequential letters can be applied to vowels, all of which correspond to characters sequences that follow a predefined order.
But, what if you need to create a sequence that has a completely different formation order? A string or number that does not follow the rule natural of decimal numbers or the alphabet? For example, if you need to create sequences like the following:
How to create growing sequences but made up of characters made up of letters, numbers, punctuation marks, etc.? For this kind of need it is that the “sequence” package was created which contains classes and the means that allow the definition of a sequence of alphanumeric values and the generation these values in ascending / descending sequential order.
You can define any sequence of numeric or alphanumeric characters, which can be letters, numbers, decimals, hexadecimals, DNA sequence, etc. Using the sequence generator you can create sequences that will be generated in ascending or descending order.
You can create your own sequences or use the predefined ones.
Audious is a virtual assistant for music collections. Amongst other things, it provides the ability to manage albums by indicating the ones which are not in playlists. It also gives detailed statistics about a music collection, such as the number of artists and albums or the overall duration of a music category. It can also be used to sanitize playlists by showing corrupted or missing songs, and can export playlists in different formats, such as FLAC or MP3.
🎶
🧠 Broaden your musical horizons
The more your music collection will grow, the more it will be difficult to remember which albums and songs you liked or listened to. Playlists are there to help us reminding which songs or albums we liked. But there might be albums that you didn’t place in a playlist. Audious will help you managing the albums that are not present in your playlists.
🔎 Learn to know your music collection
Having information about the song currently being played or even the year of the album you want to listen to is easy. However, getting the number of artists and albums, or how finding long it would take you if you wanted to listen to your entire music collection, it’s a different story. Audious will give you statistics about your music collection as well as your playlists.
❤️ Less is more
Nowadays, space is cheap. But lossless music is still demanding in size. Having your entire music collection with you all the time on a phone might be impossible. Audious will export all the songs of your playlists and ensure that your favorite songs will always be with you.
🎶
Getting started: This section provides everything that is required to install Audious. It also shows how to setup it properly.
Tips: Several tips are given in this section to have a better user experience.
For Developers and Audiophiles: Audious has been designed as an open source project since day 1. This section clarifies the tool’s internals, explaining how to generate the source code documentation, and how the MP3 conversion is performed during the exportation process.
About: The origin of the project and the different licenses are detailed in this section.
🎶
Without music, life would be a mistake. — F. Nietzsche
Getting started
Requirements
A basic knowledge of lossless and lossy audio formats
Install the requirements with pip3: pip install -r requirements.txt
Edit the preferences
A preferences file, named preferences.json, is available under a preferences/ directory located at root of the repository. It needs to be properly configured before running Audious for the first time.
The exportation key gives details about the playlists exportation:
root is the absolute path of the directory where will be located the exported songs and playlists
playlists is the directory containing all the exported playlists
format is the format song for the playlists exportation; only two options are available: flac and mp3
Note: all given directories should have an ending / (e.g. Artists/, and not Artists)
For instance, let’s suppose that we create an Export/ directory in the Collection/ and we want to export all the songs of the playlists in FLAC; the exportation key in preferences.json should be edited as shown below:
Ensure first the Python virtual environment is enabled by running source ./venv/bin/activate
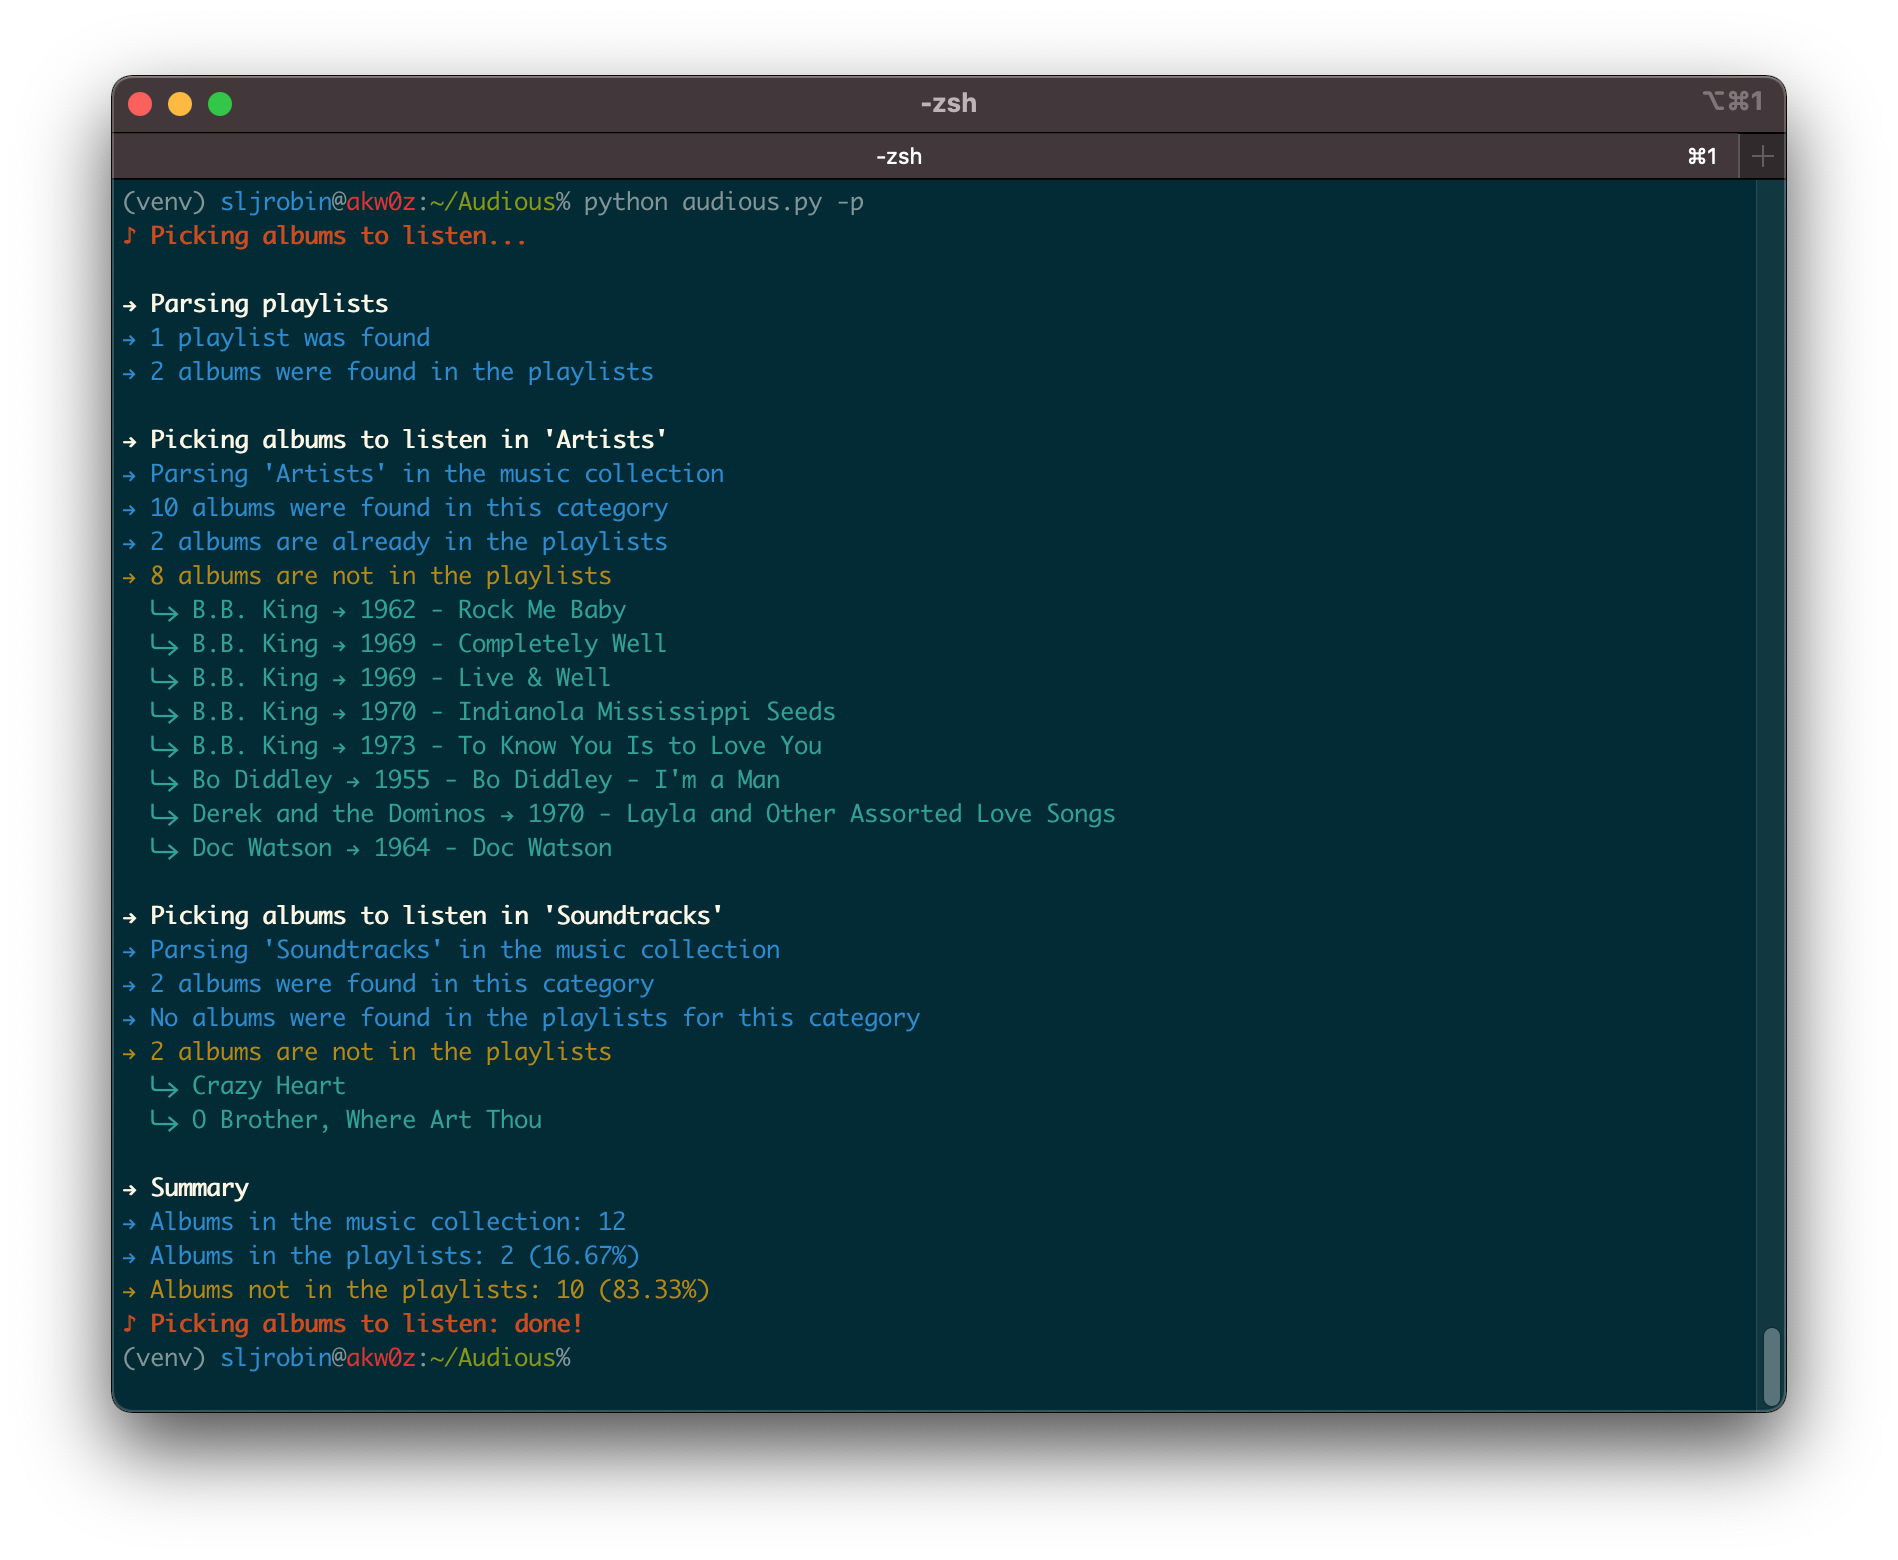
Run Audious: python audious.py --help
% python audious.py --help
usage: audious.py [-h] [-e] [-p] [-s]
optional arguments:
-h, --help show this help message and exit
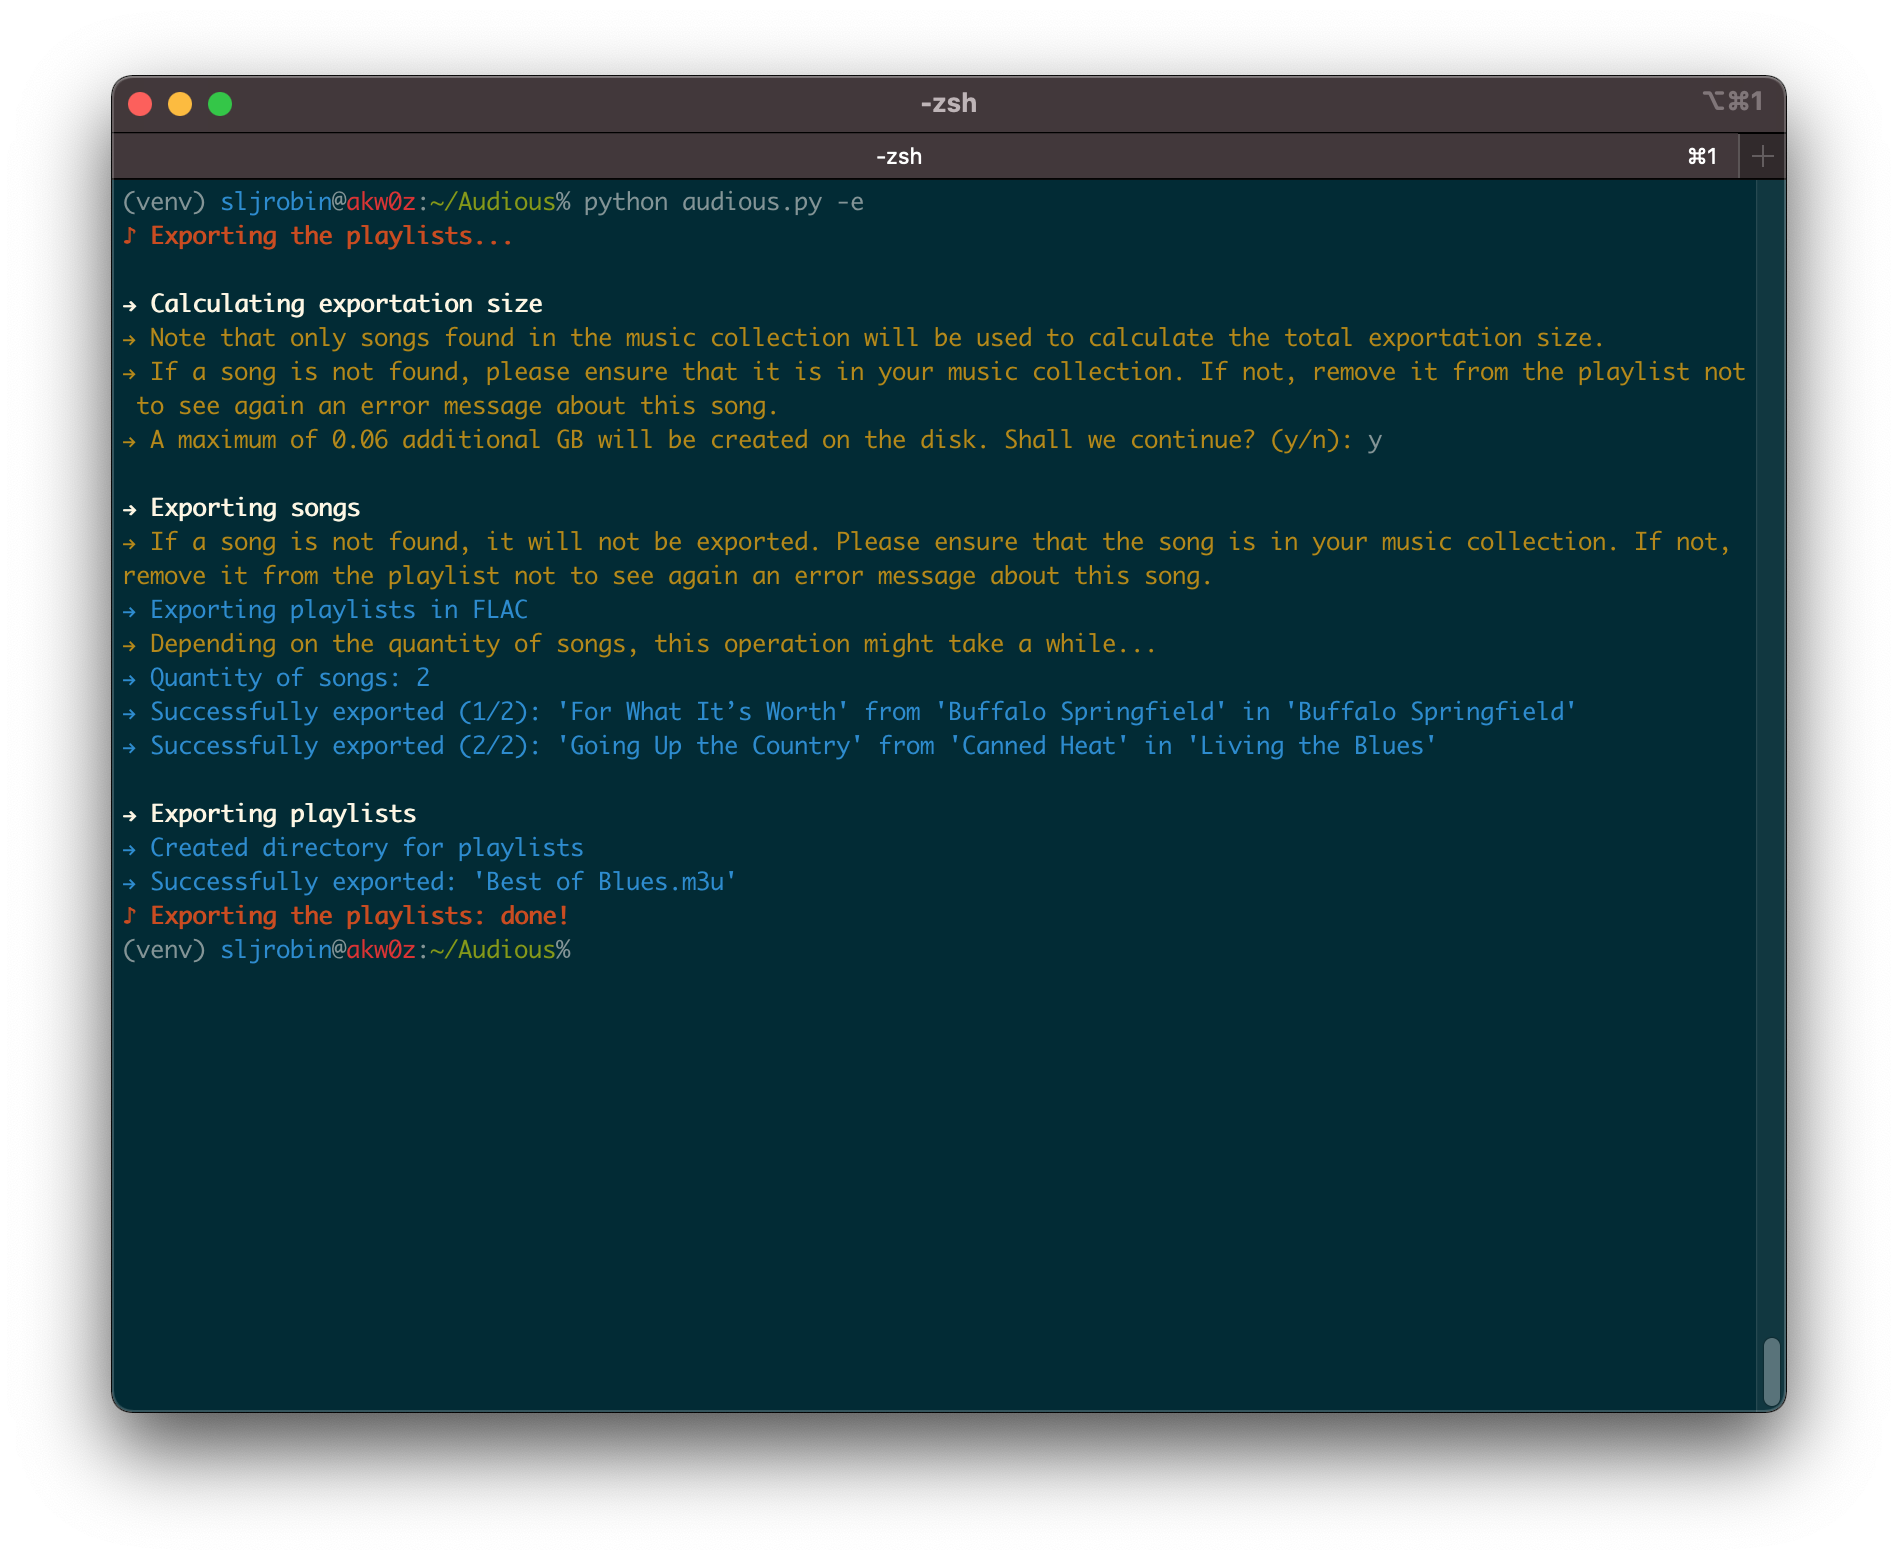
-e, --export Export the playlists in FLAC or in MP3
-p, --pick Pick the albums from the music collection that are not in the playlists
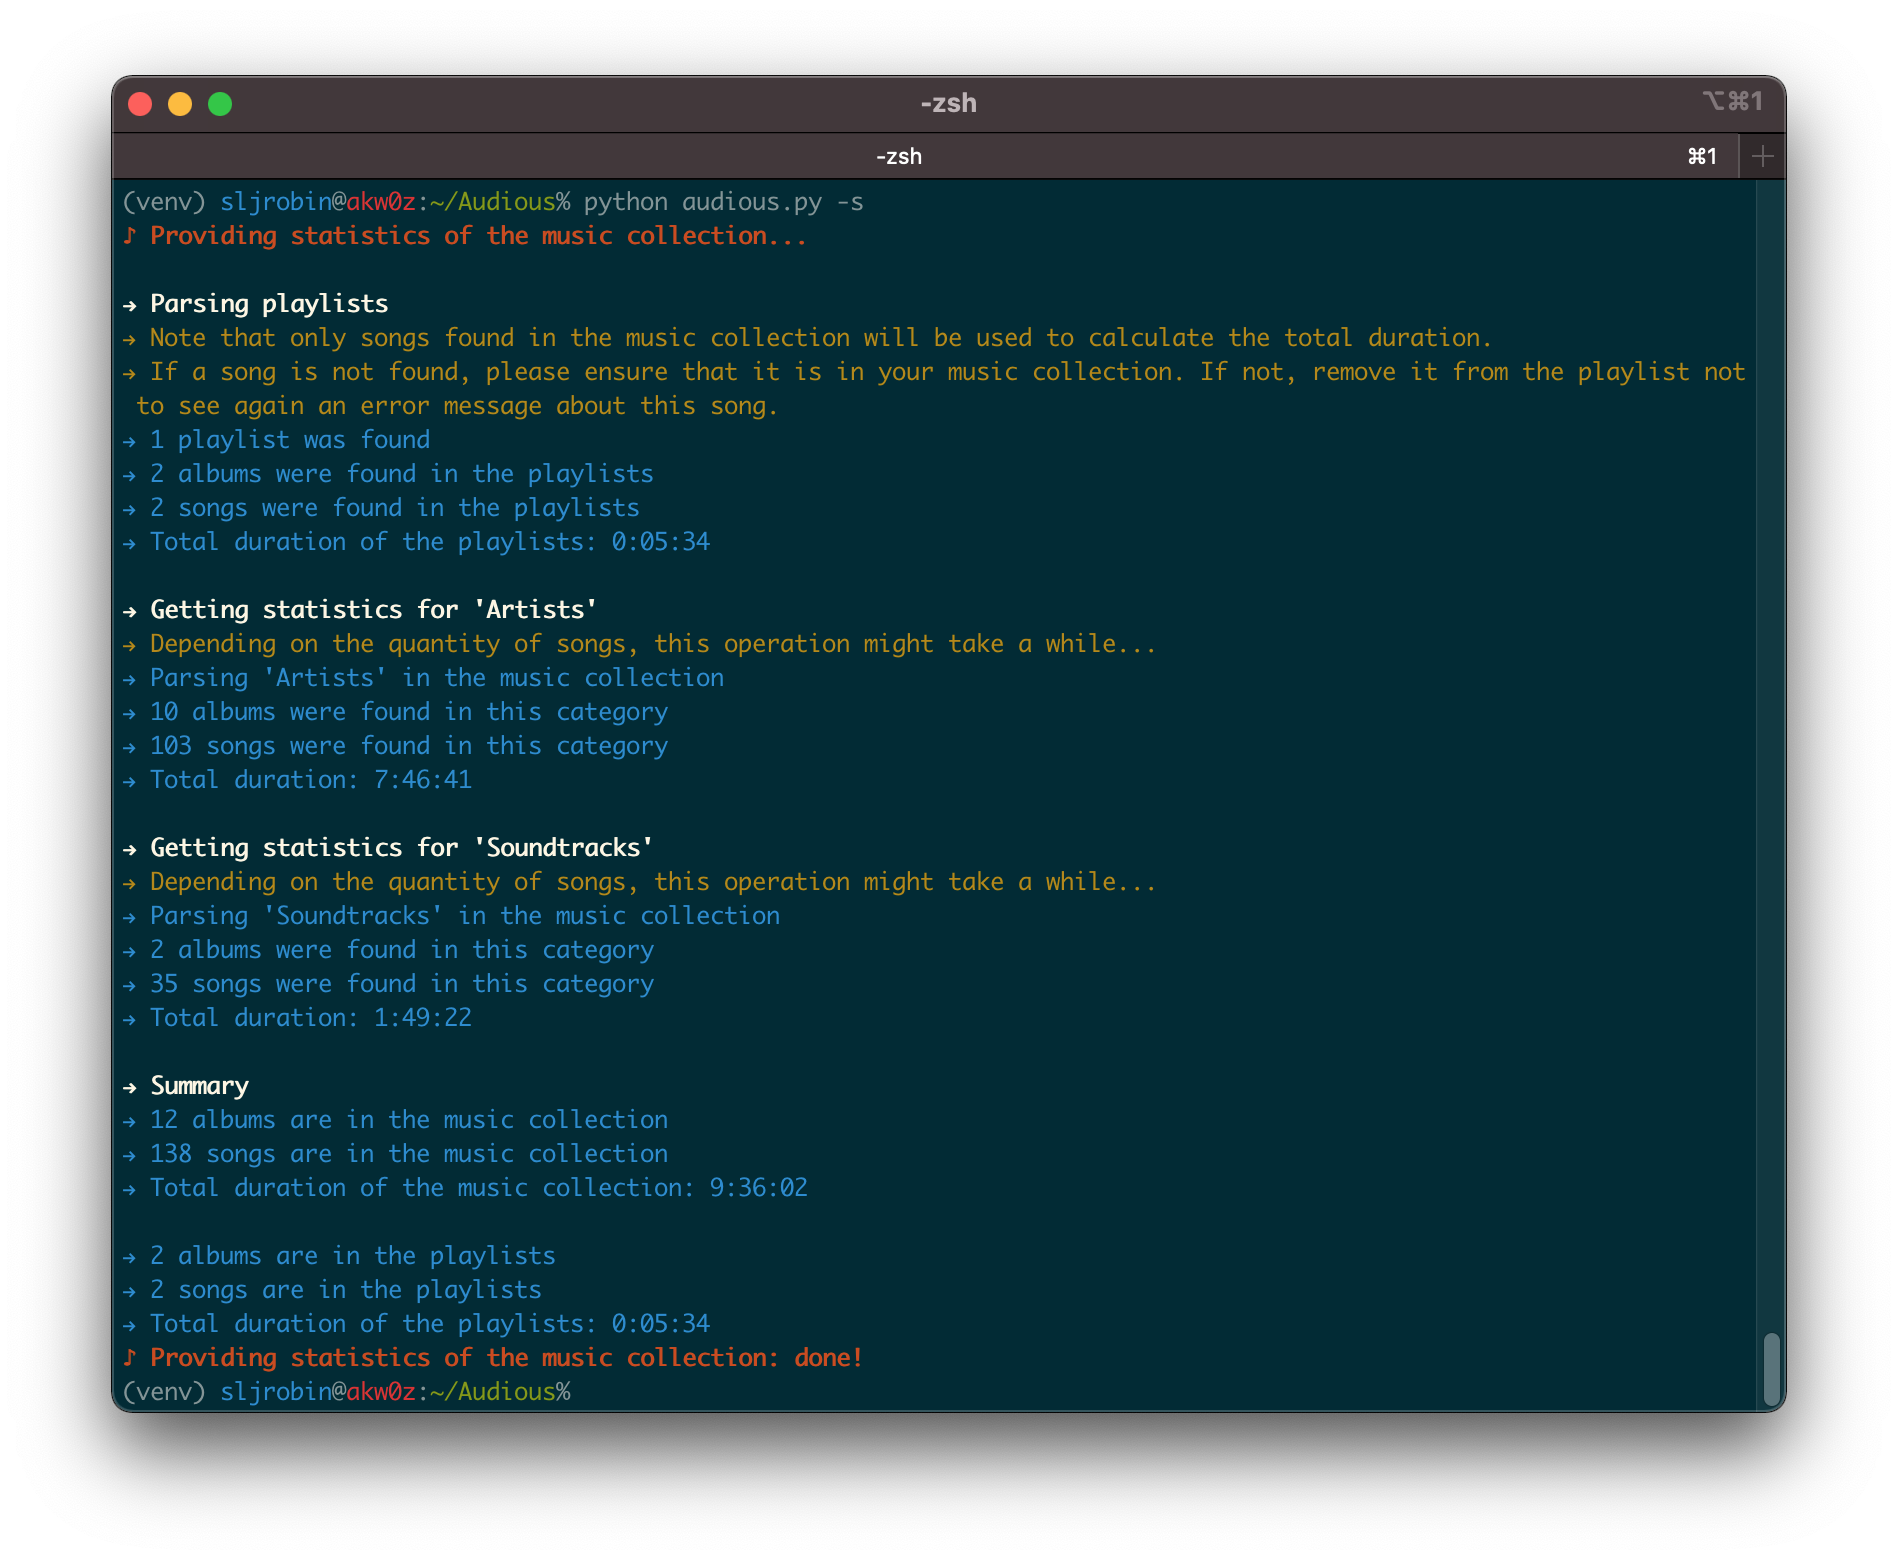
-s, --stats Provide statistics of the music collection and the playlists
Everything is now ready!
Tips
Handling long outputs
Because Audious is capable of parsing big music collections, the generated outputs might be relatively long. As a result, it might be difficult to have a quick glance at the statistics of a category or at the albums that were picked without scrolling.
An easy way to handle this scrolling issue is to combine Audious with the less command, as shown in the examples below:
python audious.py -s | less -R
python audious.py -p | less -R
Press the space bar to switch to the next page on the terminal.
Hidden files
Hidden files on Linux or macOS are beginning with a dot (.). For instance, macOS creates lots of these files, called resource forks. As a result, an album with a song called 08 - High Voltage.flac might also contain a hidden file name ._08 - High Voltage.flac.
Audious is capable of handling these hidden files; it will indicate that it is not a valid file and does not contain any valid metadata. Nevertheless, having these files might generate a lot of noise in Audious outputs with plenty of errors (e.g. The following song could not be parsed and will be ignored: [...]).
To recursively remove these files and have clean outputs, go to the root of the music collection and use the following commands (Source):
To only display hidden files in the music collection:
find /<path to music collection> -name '._*' -type f
To delete hidden files in the music collection:
find /<path to music collection> -name '._*' -type f -delete
For Developers and Audiophiles
Code documentation
The source code of Audious has been thoroughly documented in order to help people adding new features or simply improving the code.
Because the code is commented, generating a documentation becomes easy.
Generate the documentation for the Exporter() class: python -m pydoc lib/exporter.py
Generate the documentation for the entire library: python -m pydoc lib/*
Follow this tutorial for more information about pydoc
Snippet of the documentation for the lib/collection.py class:
NAME
    collection

CLASSES
    builtins.object
        Collection

    class Collection(builtins.object)
     |  Collection(display, preferences)
     |
     |  Methods defined here:
     |
     |  get_category_albums(self, category_songs)
     |      Open a category in the music collection and get a list of all the albums contained in this category.
     |      Handle macOS hidden files. Check the number of albums in the music category as well as in the music collection.
     |      Increment the total.
     |
     |      :param list category_songs: list of songs contained in a music category.
     |      :return list category_albums: list of albums contained in a music category.
     |
     |  get_category_songs(self, category, path)
     |      Open a category in the music collection and get a list of all the songs contained in this category. Select
     |      only .mp3 and .flac files with a regex.
     |
     |      :param str category: the music collection category name.
     |      :param str path: the path where the music collection category is located.
     |      :return list category_songs: list of songs contained in a music category.
[...]
The MP3 format was chosen as the secondary format in the exportation options. This decision was made to ensure a better compatibility with devices (e.g. vintage audio systems, etc.).
Command
A list of all FFmpeg parameters can be obtained with ffmpeg --help.
The MP3 conversion is performed via FFmpeg with the following command:
The name “Audious” was taken from the HBO’s Silicon Valley. In this comedy television series, “Audious” is also a virtual assistant but seems to have more bugs!
Support training/evaluation/prediction of CRNN+CTC based on EMNIST digital characters.
Background
This warehouse aims to better understand and apply CRNN+CTC, and has currently achieved digital recognition and license plate recognition. Meanwhile, LPRNet(+STNet) is a pure convolutional architecture for license plate recognition network. I believe that the implementation of these algorithms can help with the deployment of license plate recognition algorithms, such as on edge devices.
This section will go over my knowledge of the COBOL programming language. I am not very experienced with it, and likely won’t dedicate too much time to it, since it is obsolete, and only used by dinosaur mainframe computers in businesses and governments who refuse to update from an 8 bit system while the rest of the world uses (rarely:32 bit) 64 bit and 128 bit systems. Enough bashing of the language with jargon terms, so far I actually like writing in it for some reason. It isn’t as productive as C or Python though, so I prefer to stick with a newer, modern language.
Printing out to the screen in COBOL
In COBOL, to print to the screen you use the DISPLAY keyword like so:
DISPLAY"Sample text".
Comments in COBOL
COBOL comments are written like so:
*> COBOL only supports single line comments
Hello World in COBOL
Out of this example, I can only memorize the DISPLAY keyword. Here is the standard Hello World program in COBOL
In COBOL, a . must be placed at the end of every line. It is the languages equivalent to a semicolon. It is done like so:
DISPLAY"EOL".
Other knowledge of the COBOL programming language
COBOL stands for COmmon Business Oriented Language
COBOL uses the .cob.cbl and .cpy file extension, and according to Notepad++ it also uses the .cdc file format.
The Jargon file refers to COBOL as “a language for dinosaur computers”
COBOL is considered archaic by its own developers since the 1970s (specifically after the release of the C programming language) but it is still used by too many industries (over 5 billion lines of code written annually, over 200 billion lines of COBOL in total)
COBOL is NOT a semicolon and curly bracket language
No other knowledge of the COBOL programming language.
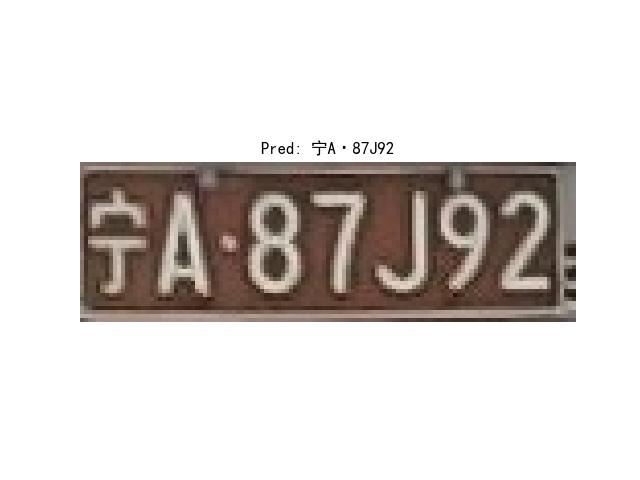
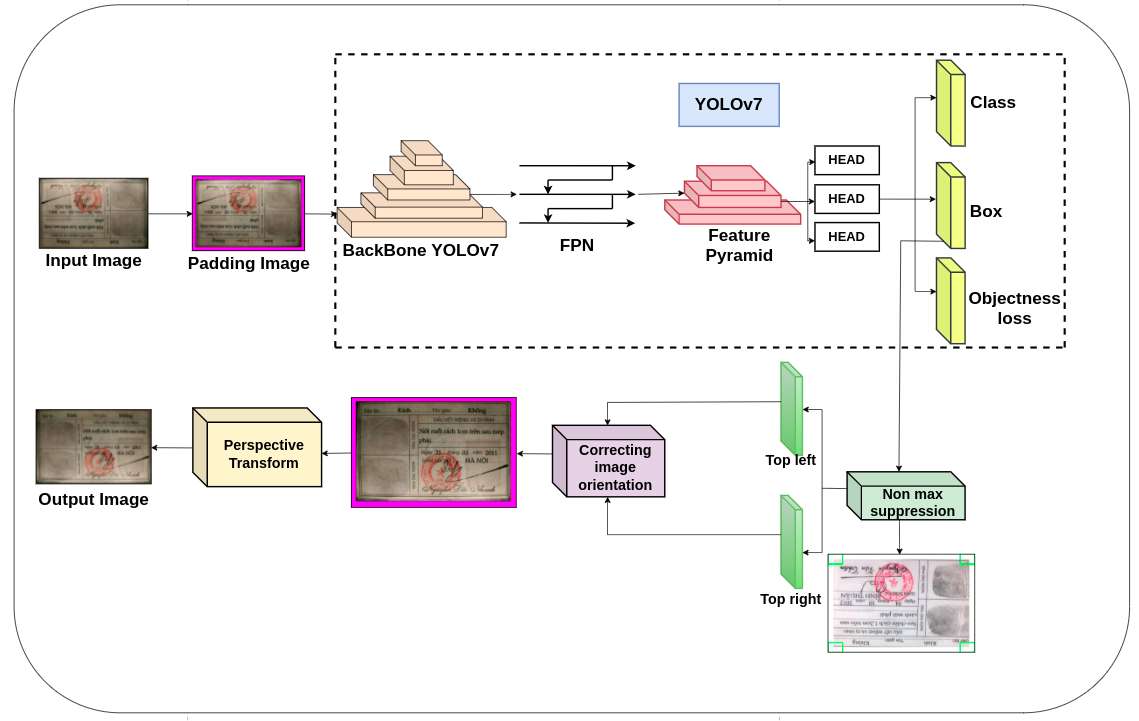
In this day and age, we have many model detection such as Faster-RCNN, SDD, YOLO, and so on.
More specifically, we will apply the lastest version of YOLO, namely YOLOv7.
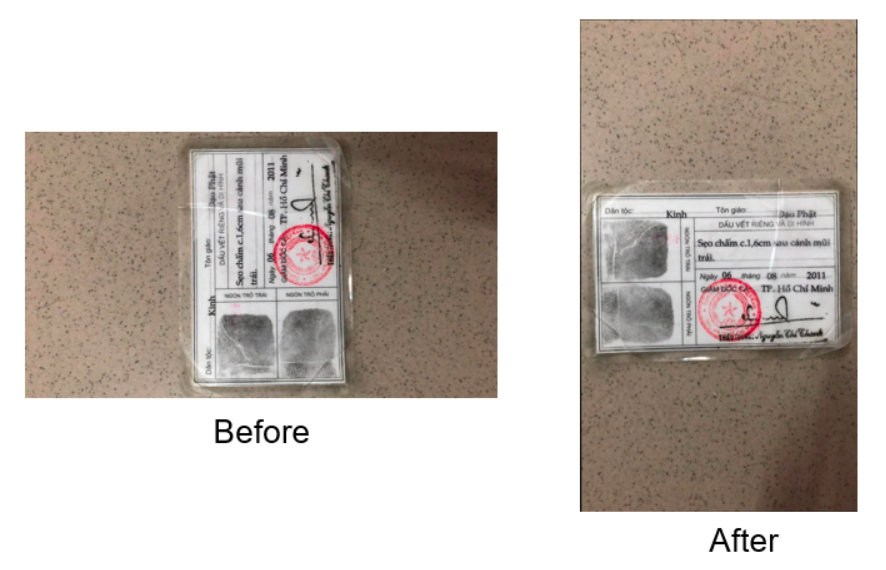
In order to take ROI in ID Card, we additionally use Perspective Transform based on
4 orientations of image, namely top-left, top-right, bottom-left, bottom-right.
However, when we cut the ROI in image completely, the orientation of image is not correct. Moreover, many applications
have used
classification model to category the corners such as CNN, ResNet50, AlexNet, and so on. But this method will
be low inference.
Therefore, we decide to apply mathematics so as to calculate the corner replied on the orientated
vector of top-left and top-right that we will describe in this repository.
Frameworks and Environments
Getting Started
Prerequisites
First of all, we need to install anaconda environment.
See the open issues for a full list of proposed features (
and known issues).
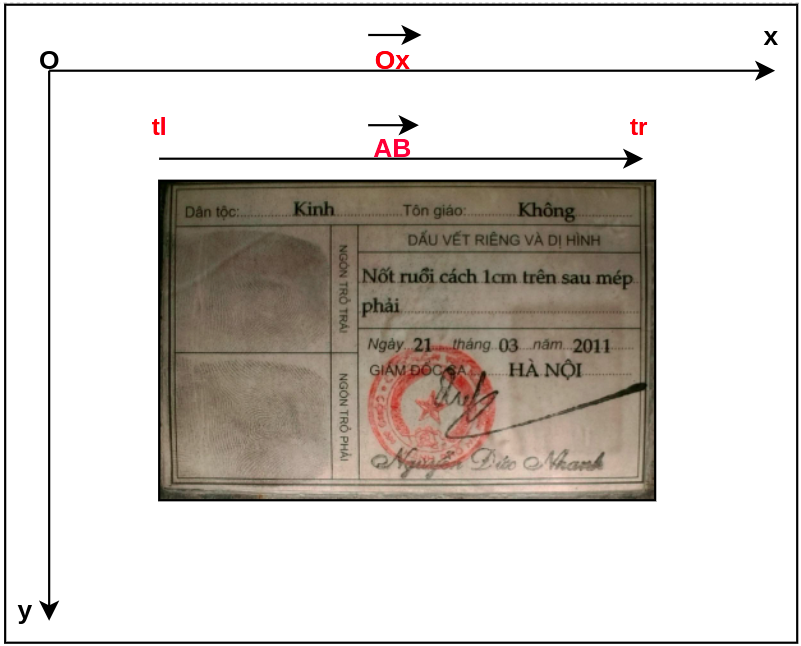
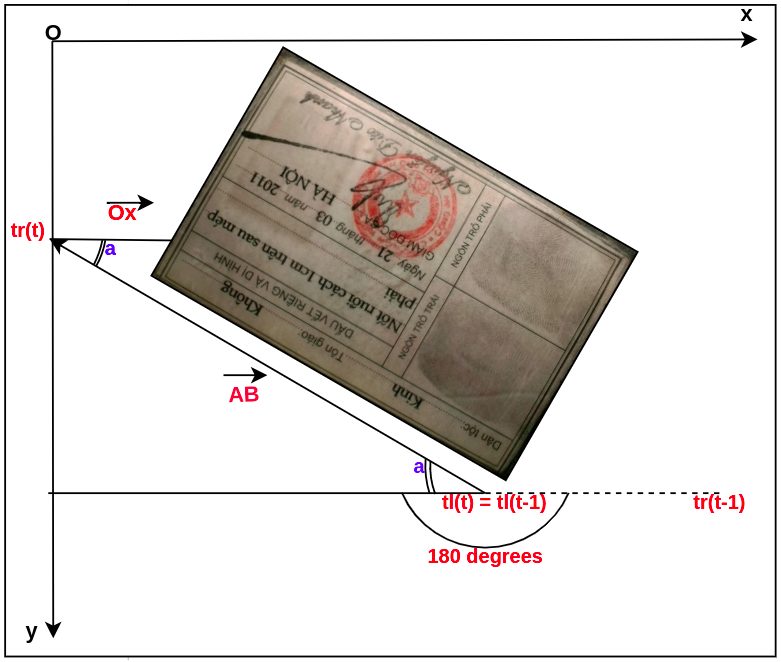
Correcting Image Orientation
Based on the predicted bounding box,
we will flip the image with 3 cases 90, 180, 270
degrees by calculating the angle between vector Ox
and vector containing coordinates top left and top right
for vector AB with A as top left, B is the top right of the image as shown below.
Let’s assume that vector AB(xB – xA, yB-yA) is the combination between top_left(tl) and top_right(tr) coordination.
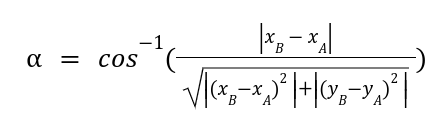
Therefore, we will have the equation to rotate.
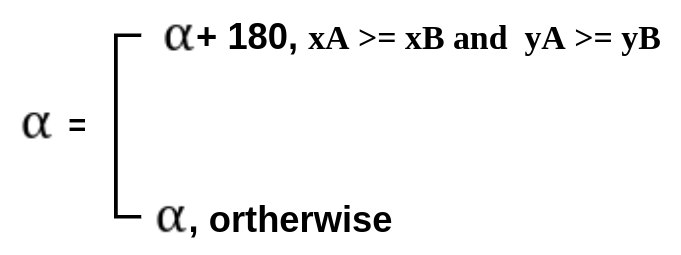
On the other hand, if the image has the angle which is different with zero and greater than 180 degrees, the image will
be considered with the condition below to rotate suitably.
Otherwise, the angle will be rotated following the figure above.